The 8-Step Checklist To Buying Your First Cryptocurrency At Binance and Coinbase
Go through the following checklist and the entire process will be a breeze.
Go through the following checklist and the entire process will be a breeze.
STEP #1 → Register a Coinbase account
Click on the following link so that when you buy or sell $100 of coins or more, both of us will earn $10 of free bitcoin! 👍
https://www.coinbase.com/join/5a56ca81e4f2f2059b18fc18
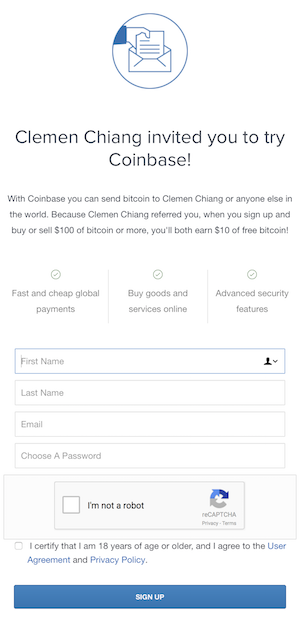
After clicking the referral link, you will see this message on the left. Go through the registration process until you reach ID verification.
STEP #2 → Complete ID Verification at Coinbase
Use the Coinbase mobile app (iOS or Android) to complete the ID Verification step using your phone’s camera.
PS. This will save you from the nightmares of using camera on a desktop or laptop computer because the photo taken will “never” pass the verification (it happened to me).
PSS. I also tried using the mobile phone version where they send you an SMS. Again, you have to submit your photo via Messages. But somehow, I kept getting “Message Send Failure”.
STEP #3 → Link Your Credit/Debit Card to Coinbase
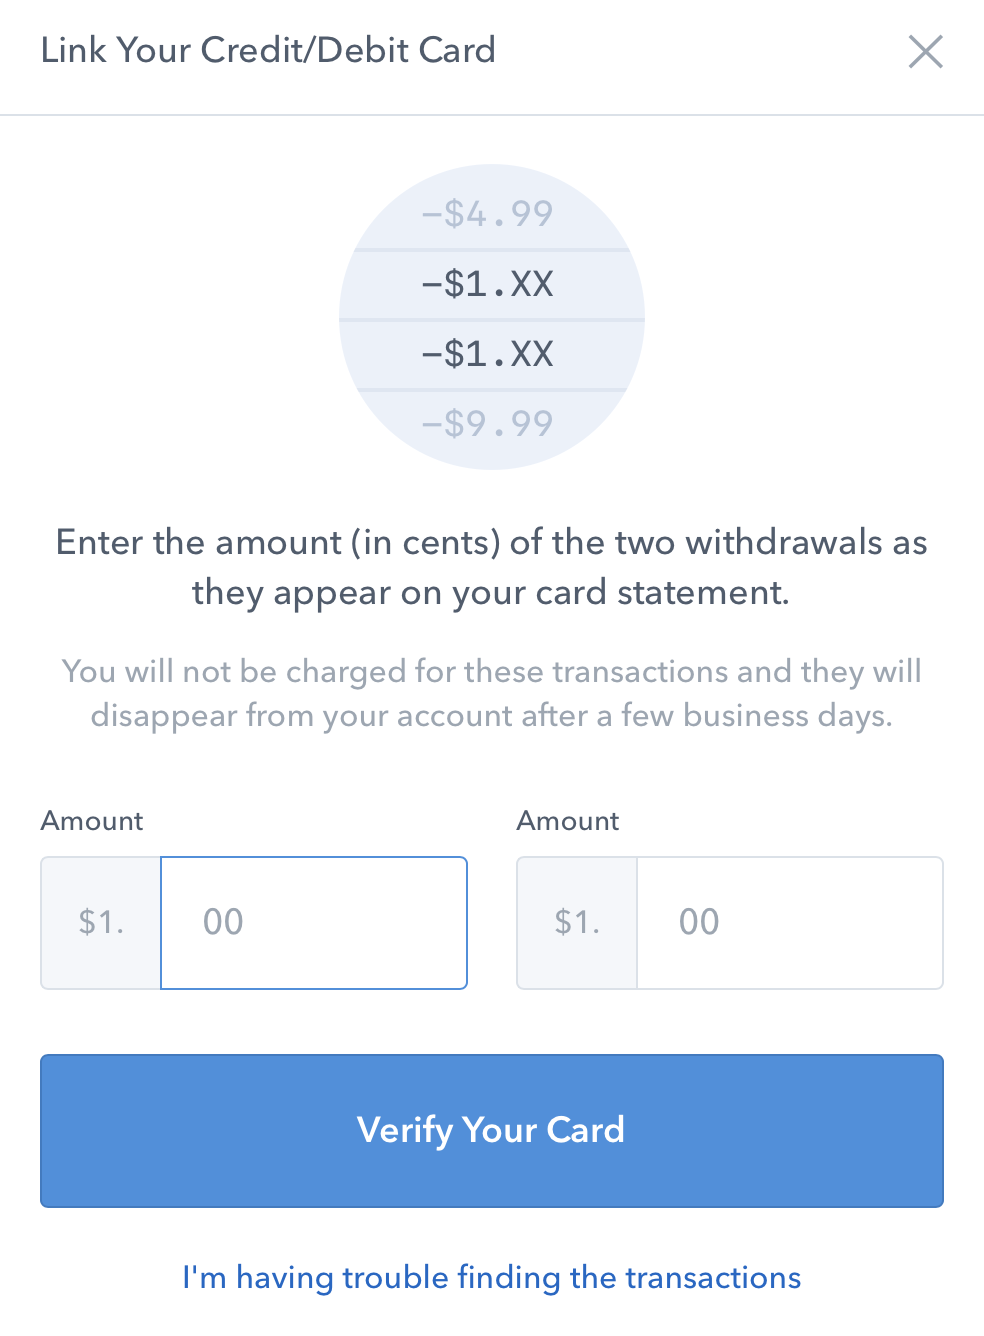
Wait 24 hours for the verification amounts to display on your card’s recent activity.
I waited for 12 hours.
The short-cut is to call up your credit card company instead of checking the online statements.
STEP #4 → Register a Binance account
Click on the following referral link to show some love ❤️ and your support for this 8-Step Checklist. Truly, I appreciate it if you do so.
https://www.binance.com/?ref=21086551
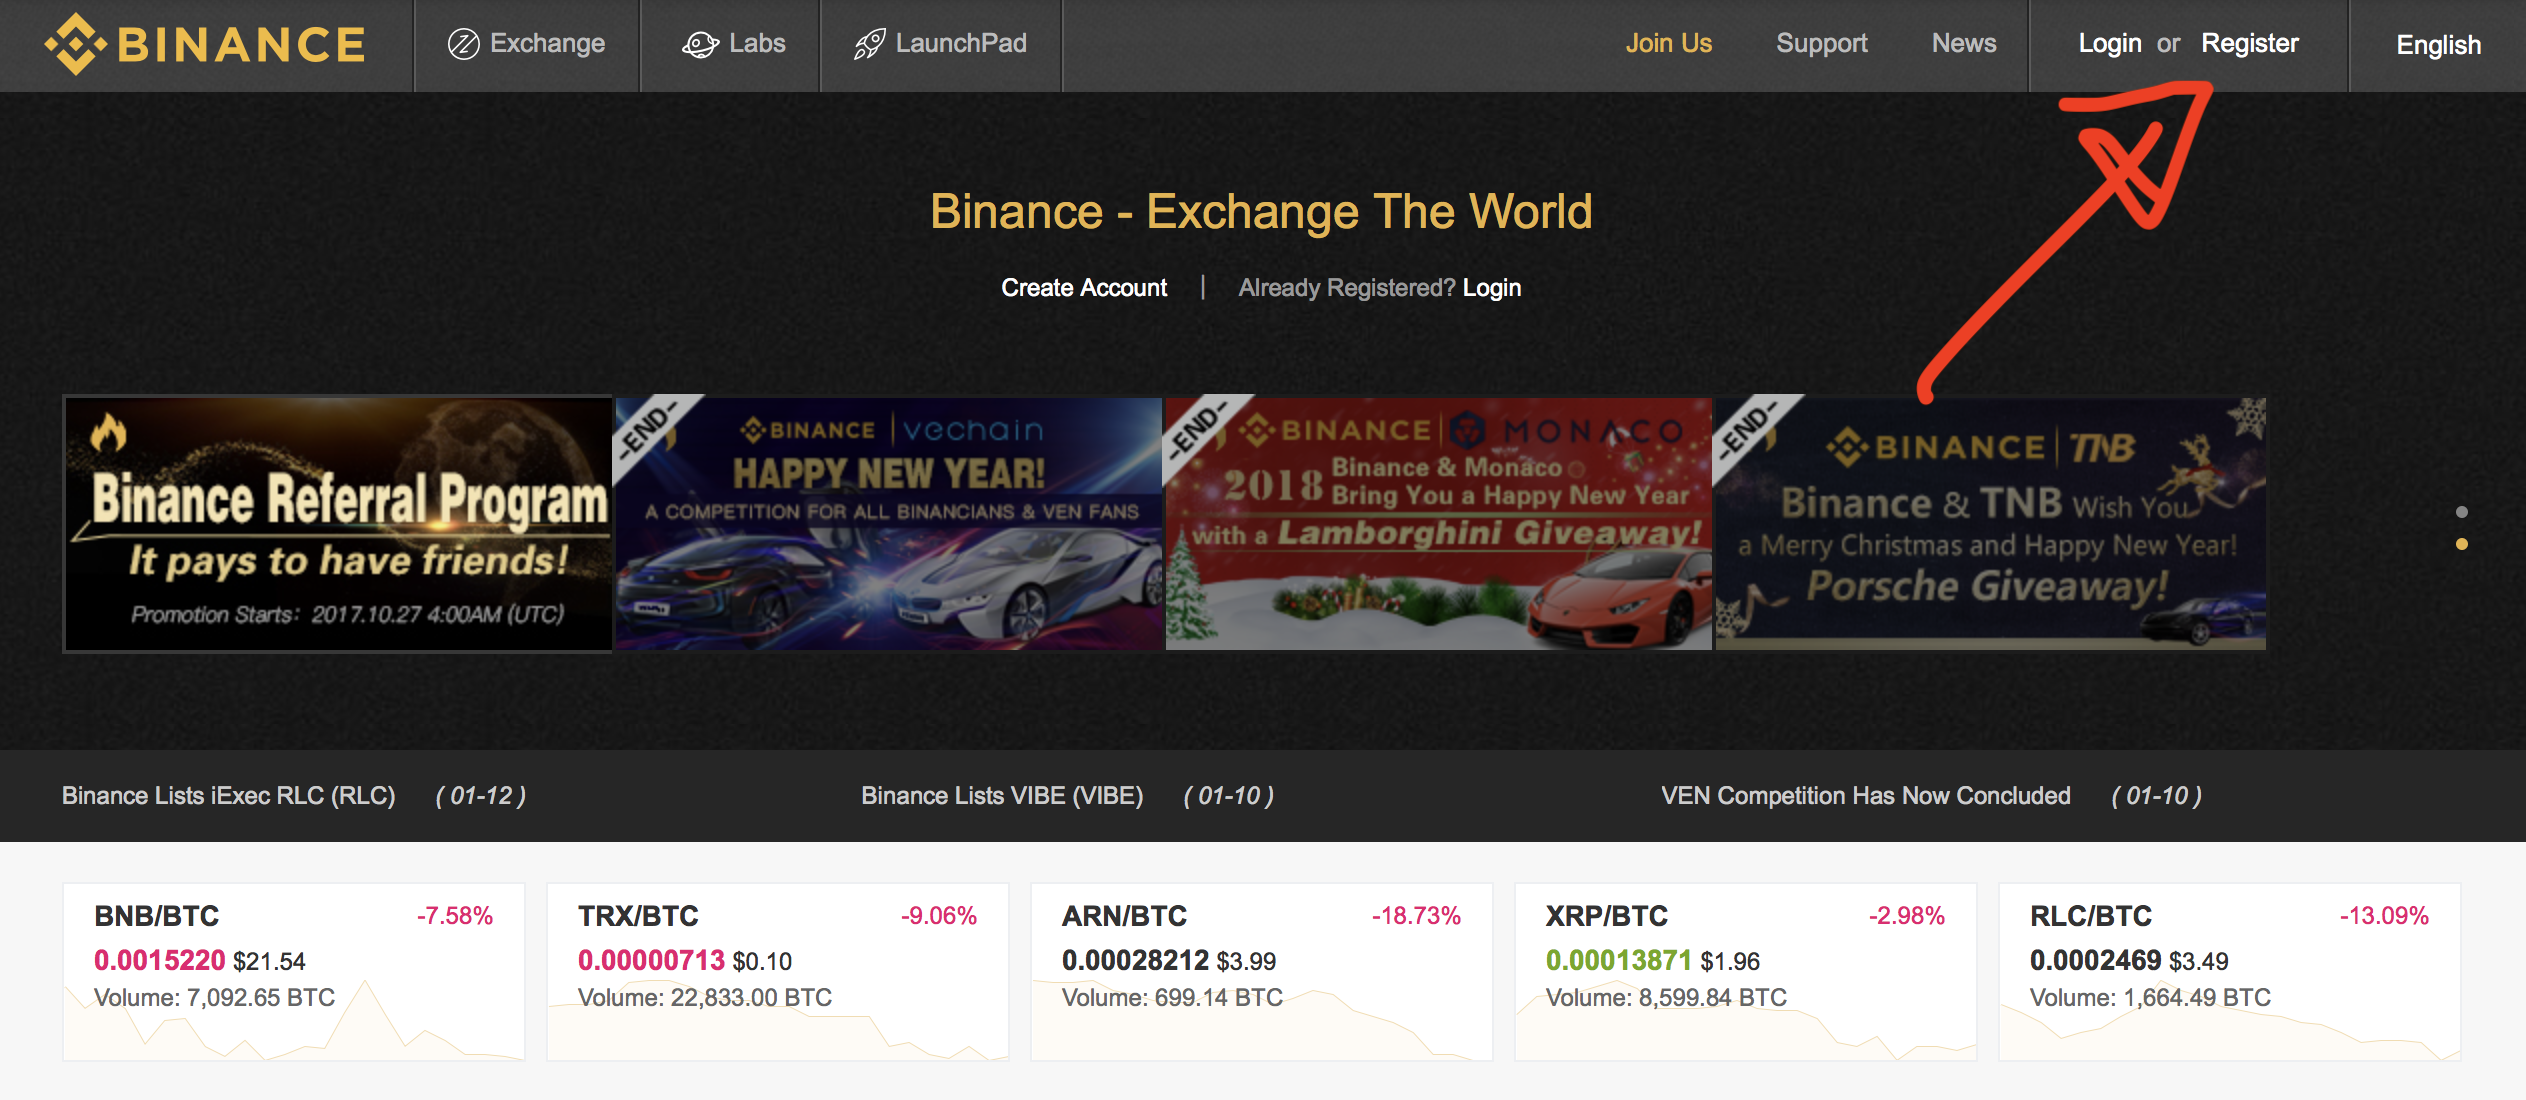
After clicking the referral link, you will see this page below. Go to the top right corner to click “Register” and go through the registration process.

STEP #5 → Complete ID Verification at Binance
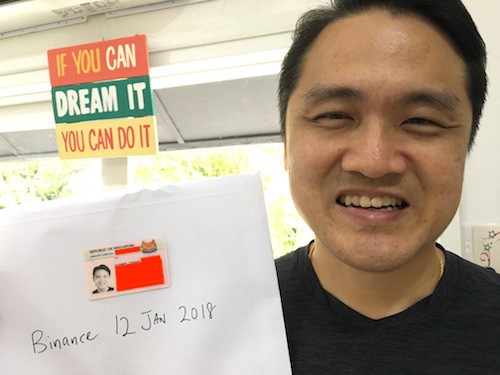
Pretty similar process like Coinbase except for the Selfie Photo. I took a picture with the front side of my ID, together with a handwritten note that says “Binance 12 January 2018”. Check out my pic below. 😂
STEP #6 → Buying coins at Coinbase for the first time
Once you have linked your credit/debit card successfully, you shall proceed to buying your first coins at Coinbase.
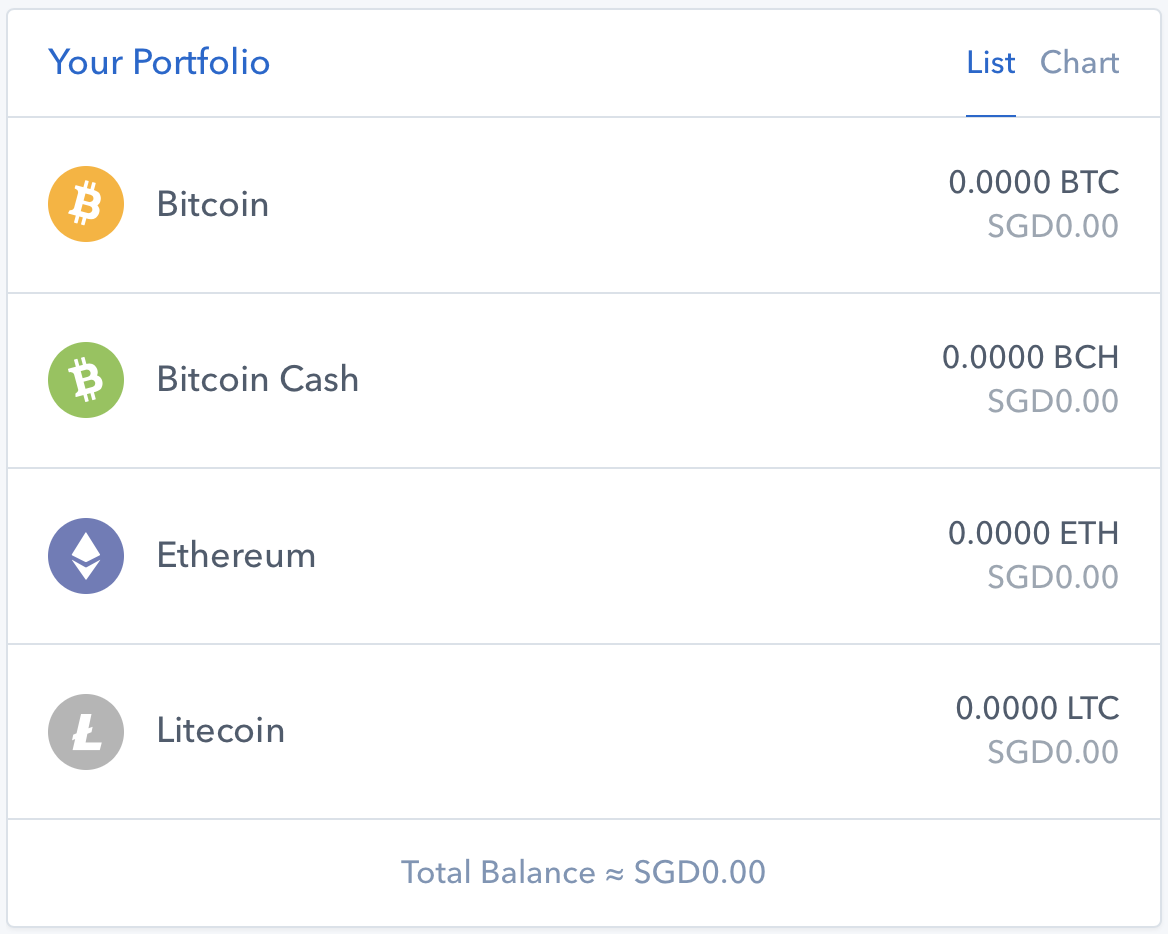
My selection process goes this way…
What coins you can buy directly from Coinbase?
→ Bitcoin (BTC) + Ethereum (ETH)
→ Bitcoin Cash (BCH) + Litecoin (LTC)
What coins you can transfer from Coinbase over to Binance?
→ Bitcoin (BTC) + Ethereum (ETH)
→ Binance Coin (BNB) + Tether (USDT)
Thus, you are left with only two choices!
→ Buy either Bitcoin (BTC) or Ethereum (ETH) from Coinbase
At this point, how do I decide between bitcoin versus ethereum? First, let’s look at the charts…
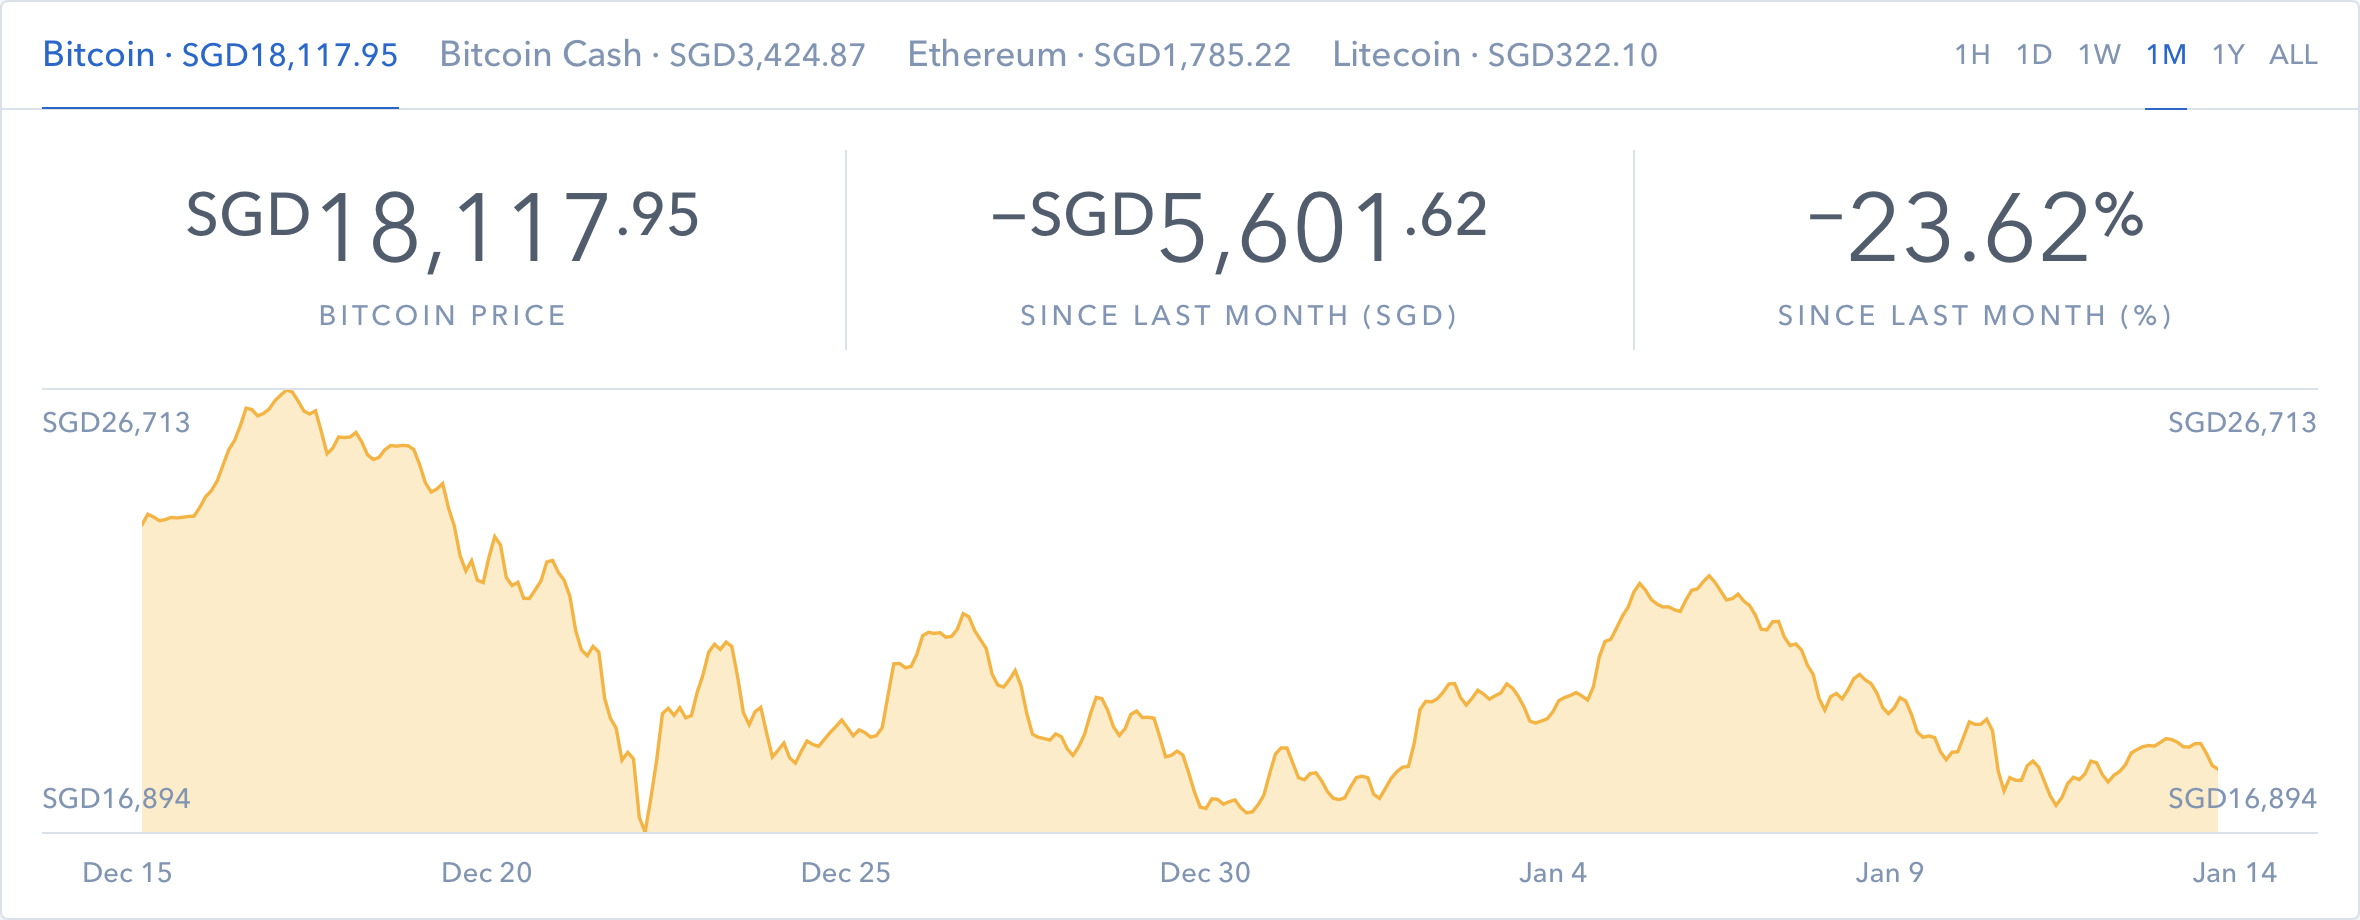
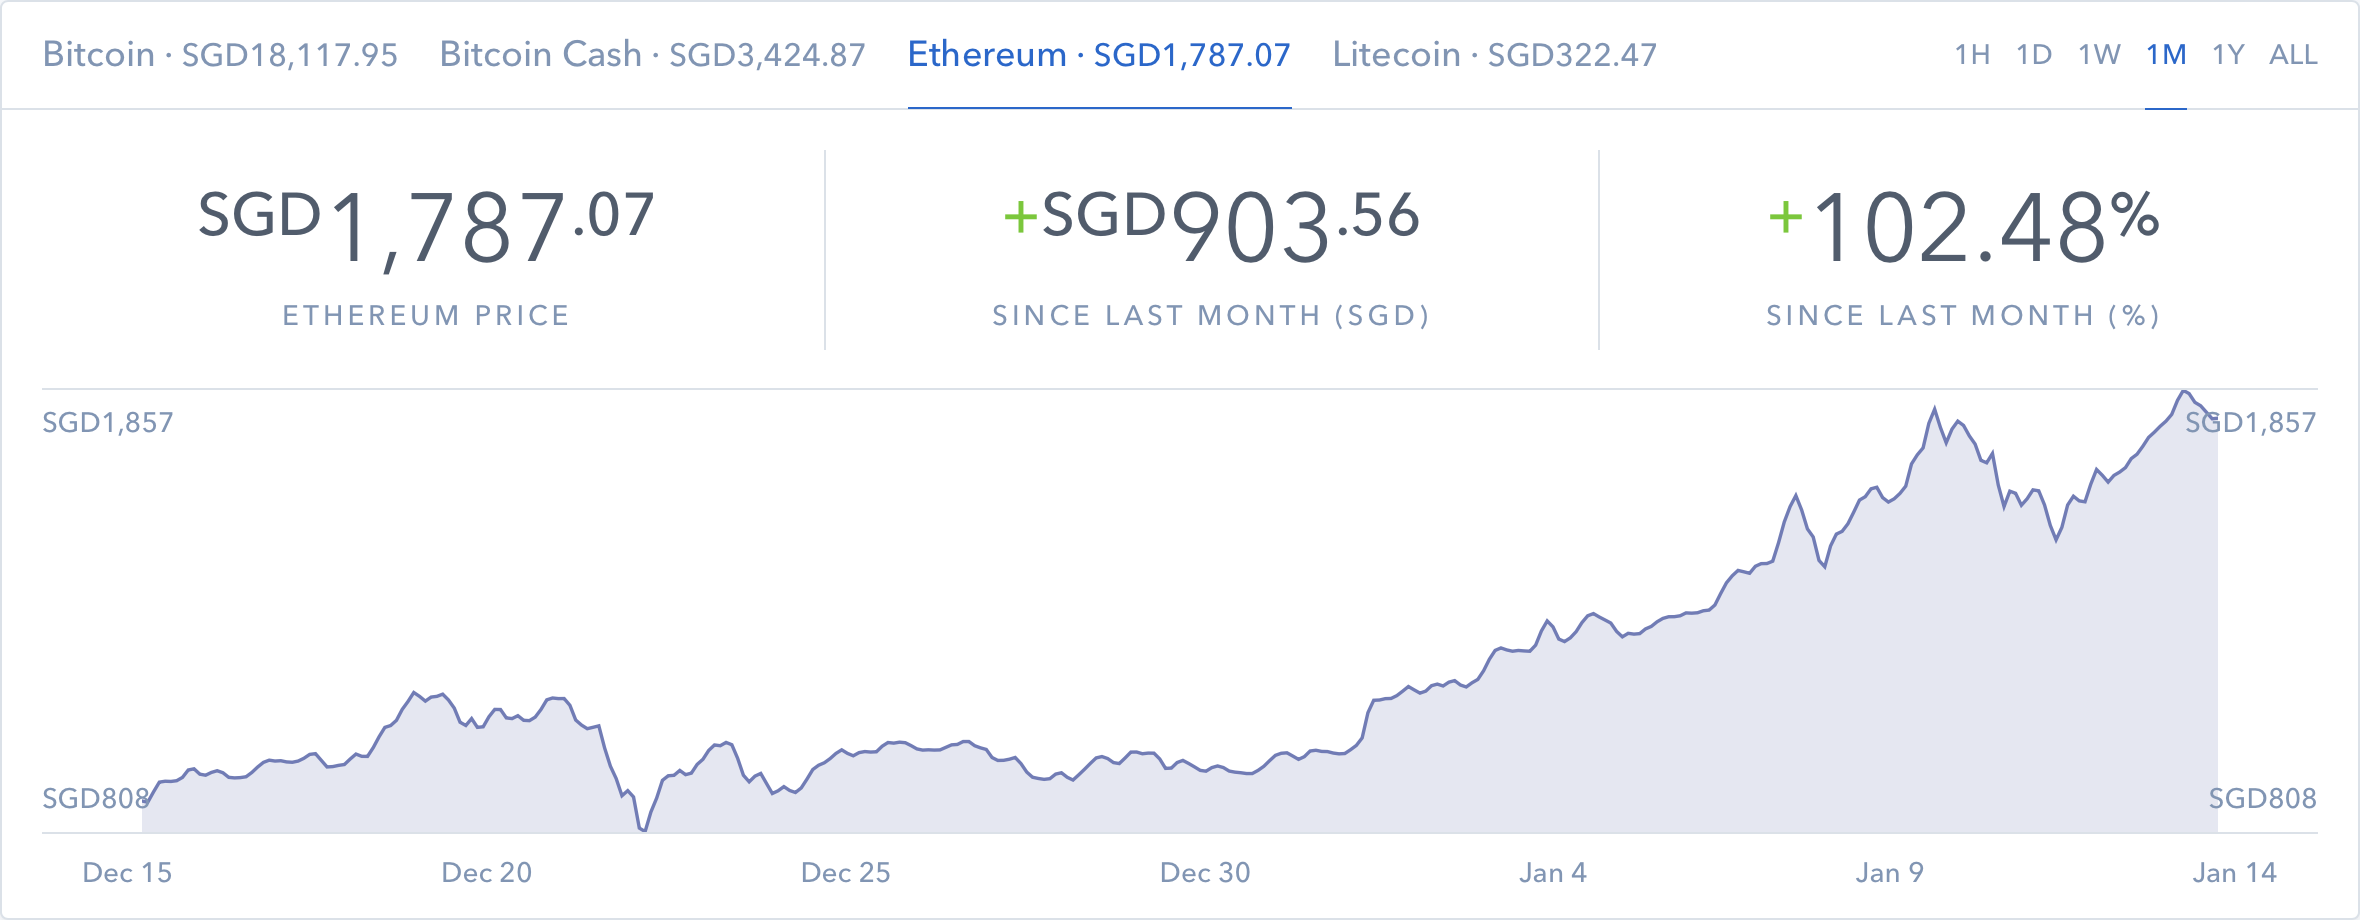
Based on the above price comparison plus detailed analysis of understanding the cryptocurrency market (which I will cover in a separate article), I decided to buy bitcoins.
Once I made the decision, the rest was easy. Just go ahead to complete the remaining steps…
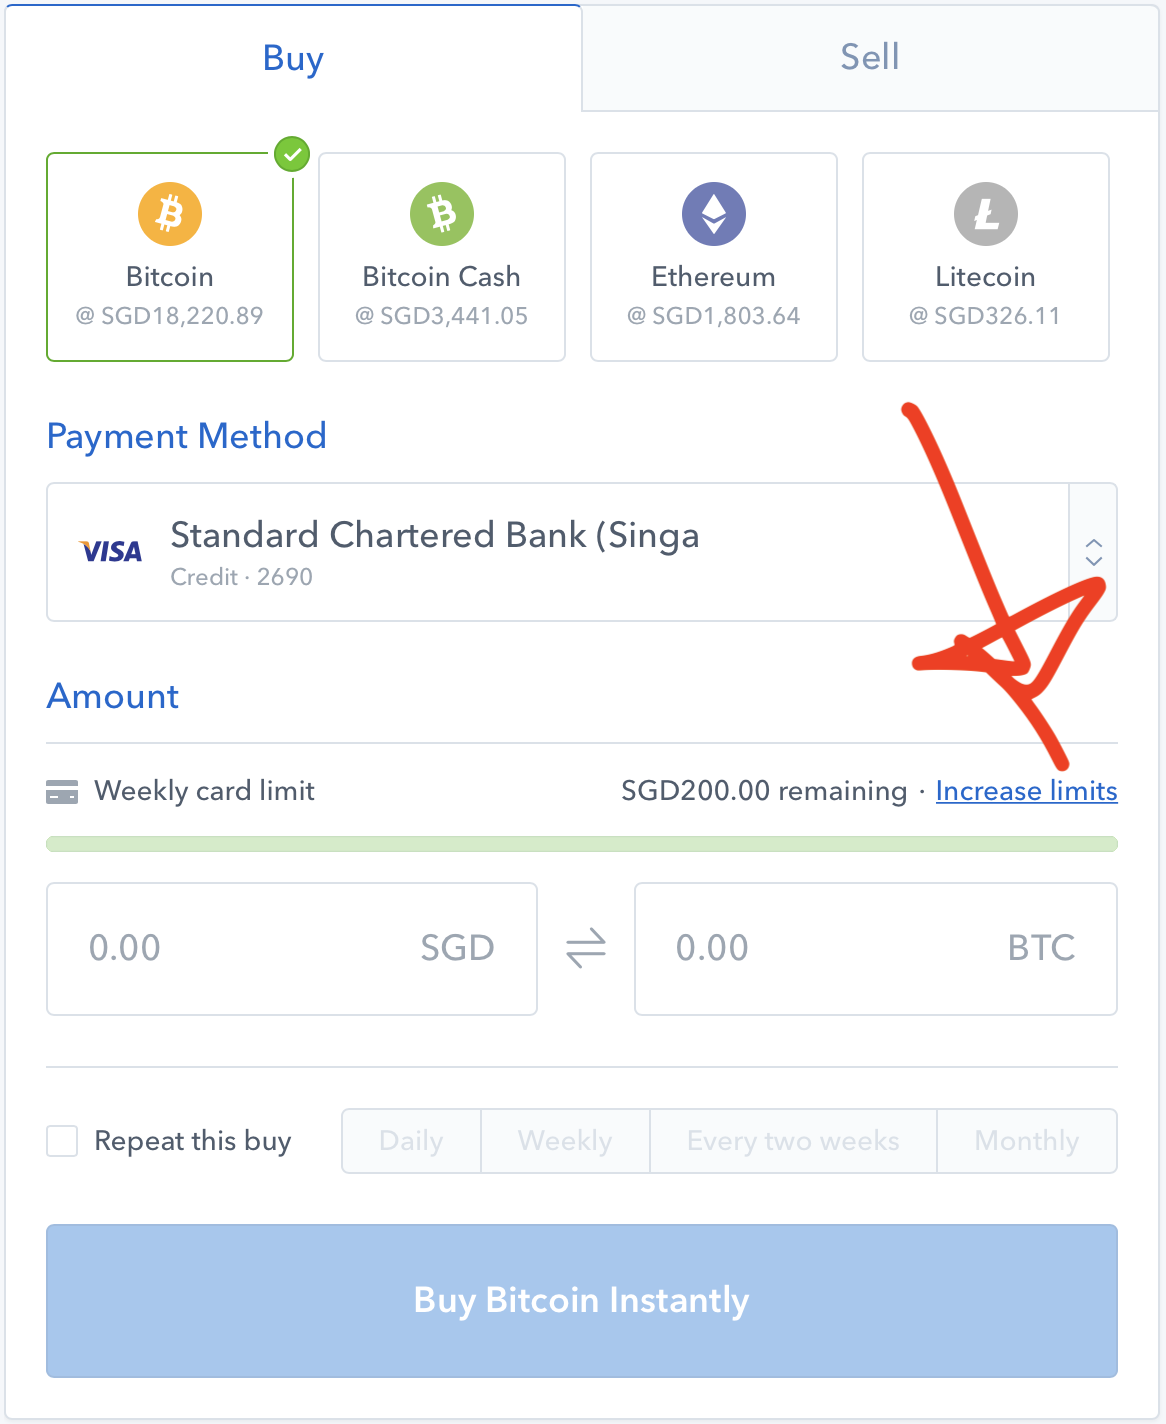
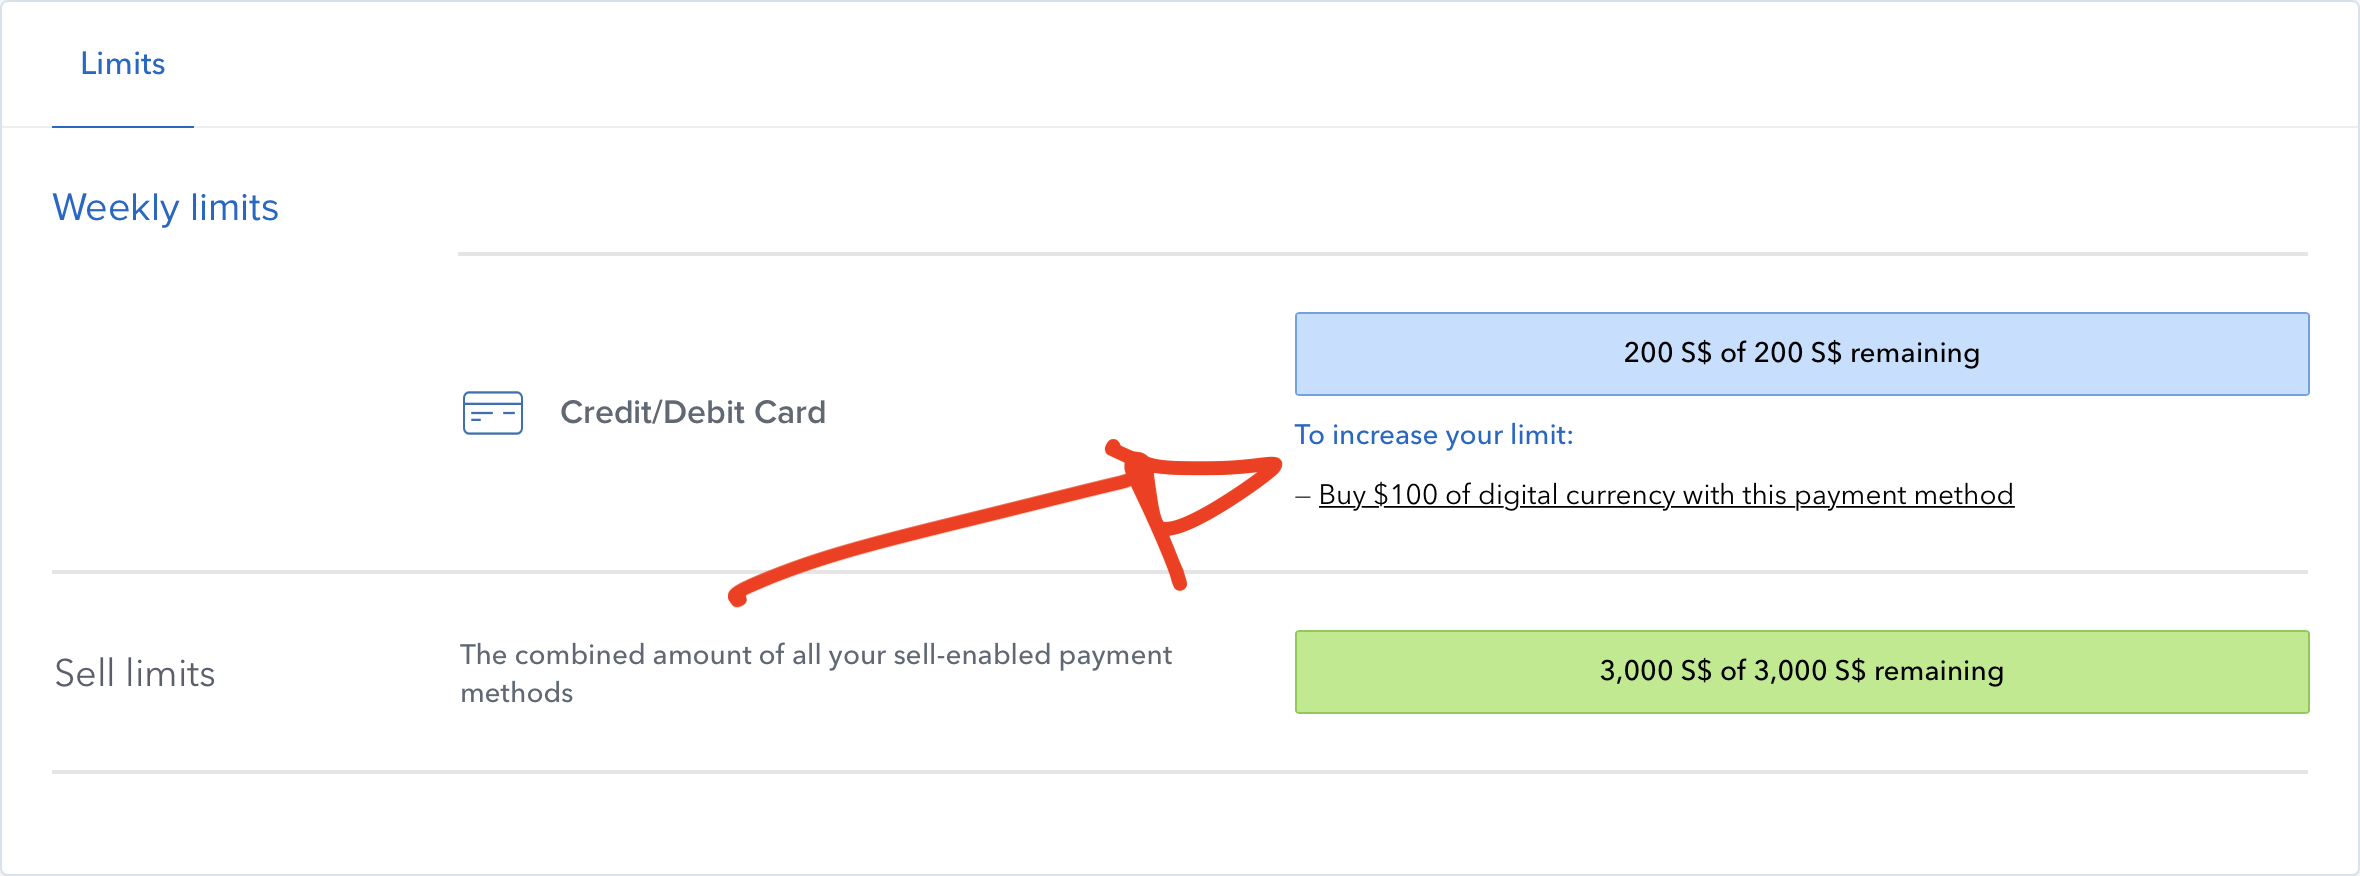
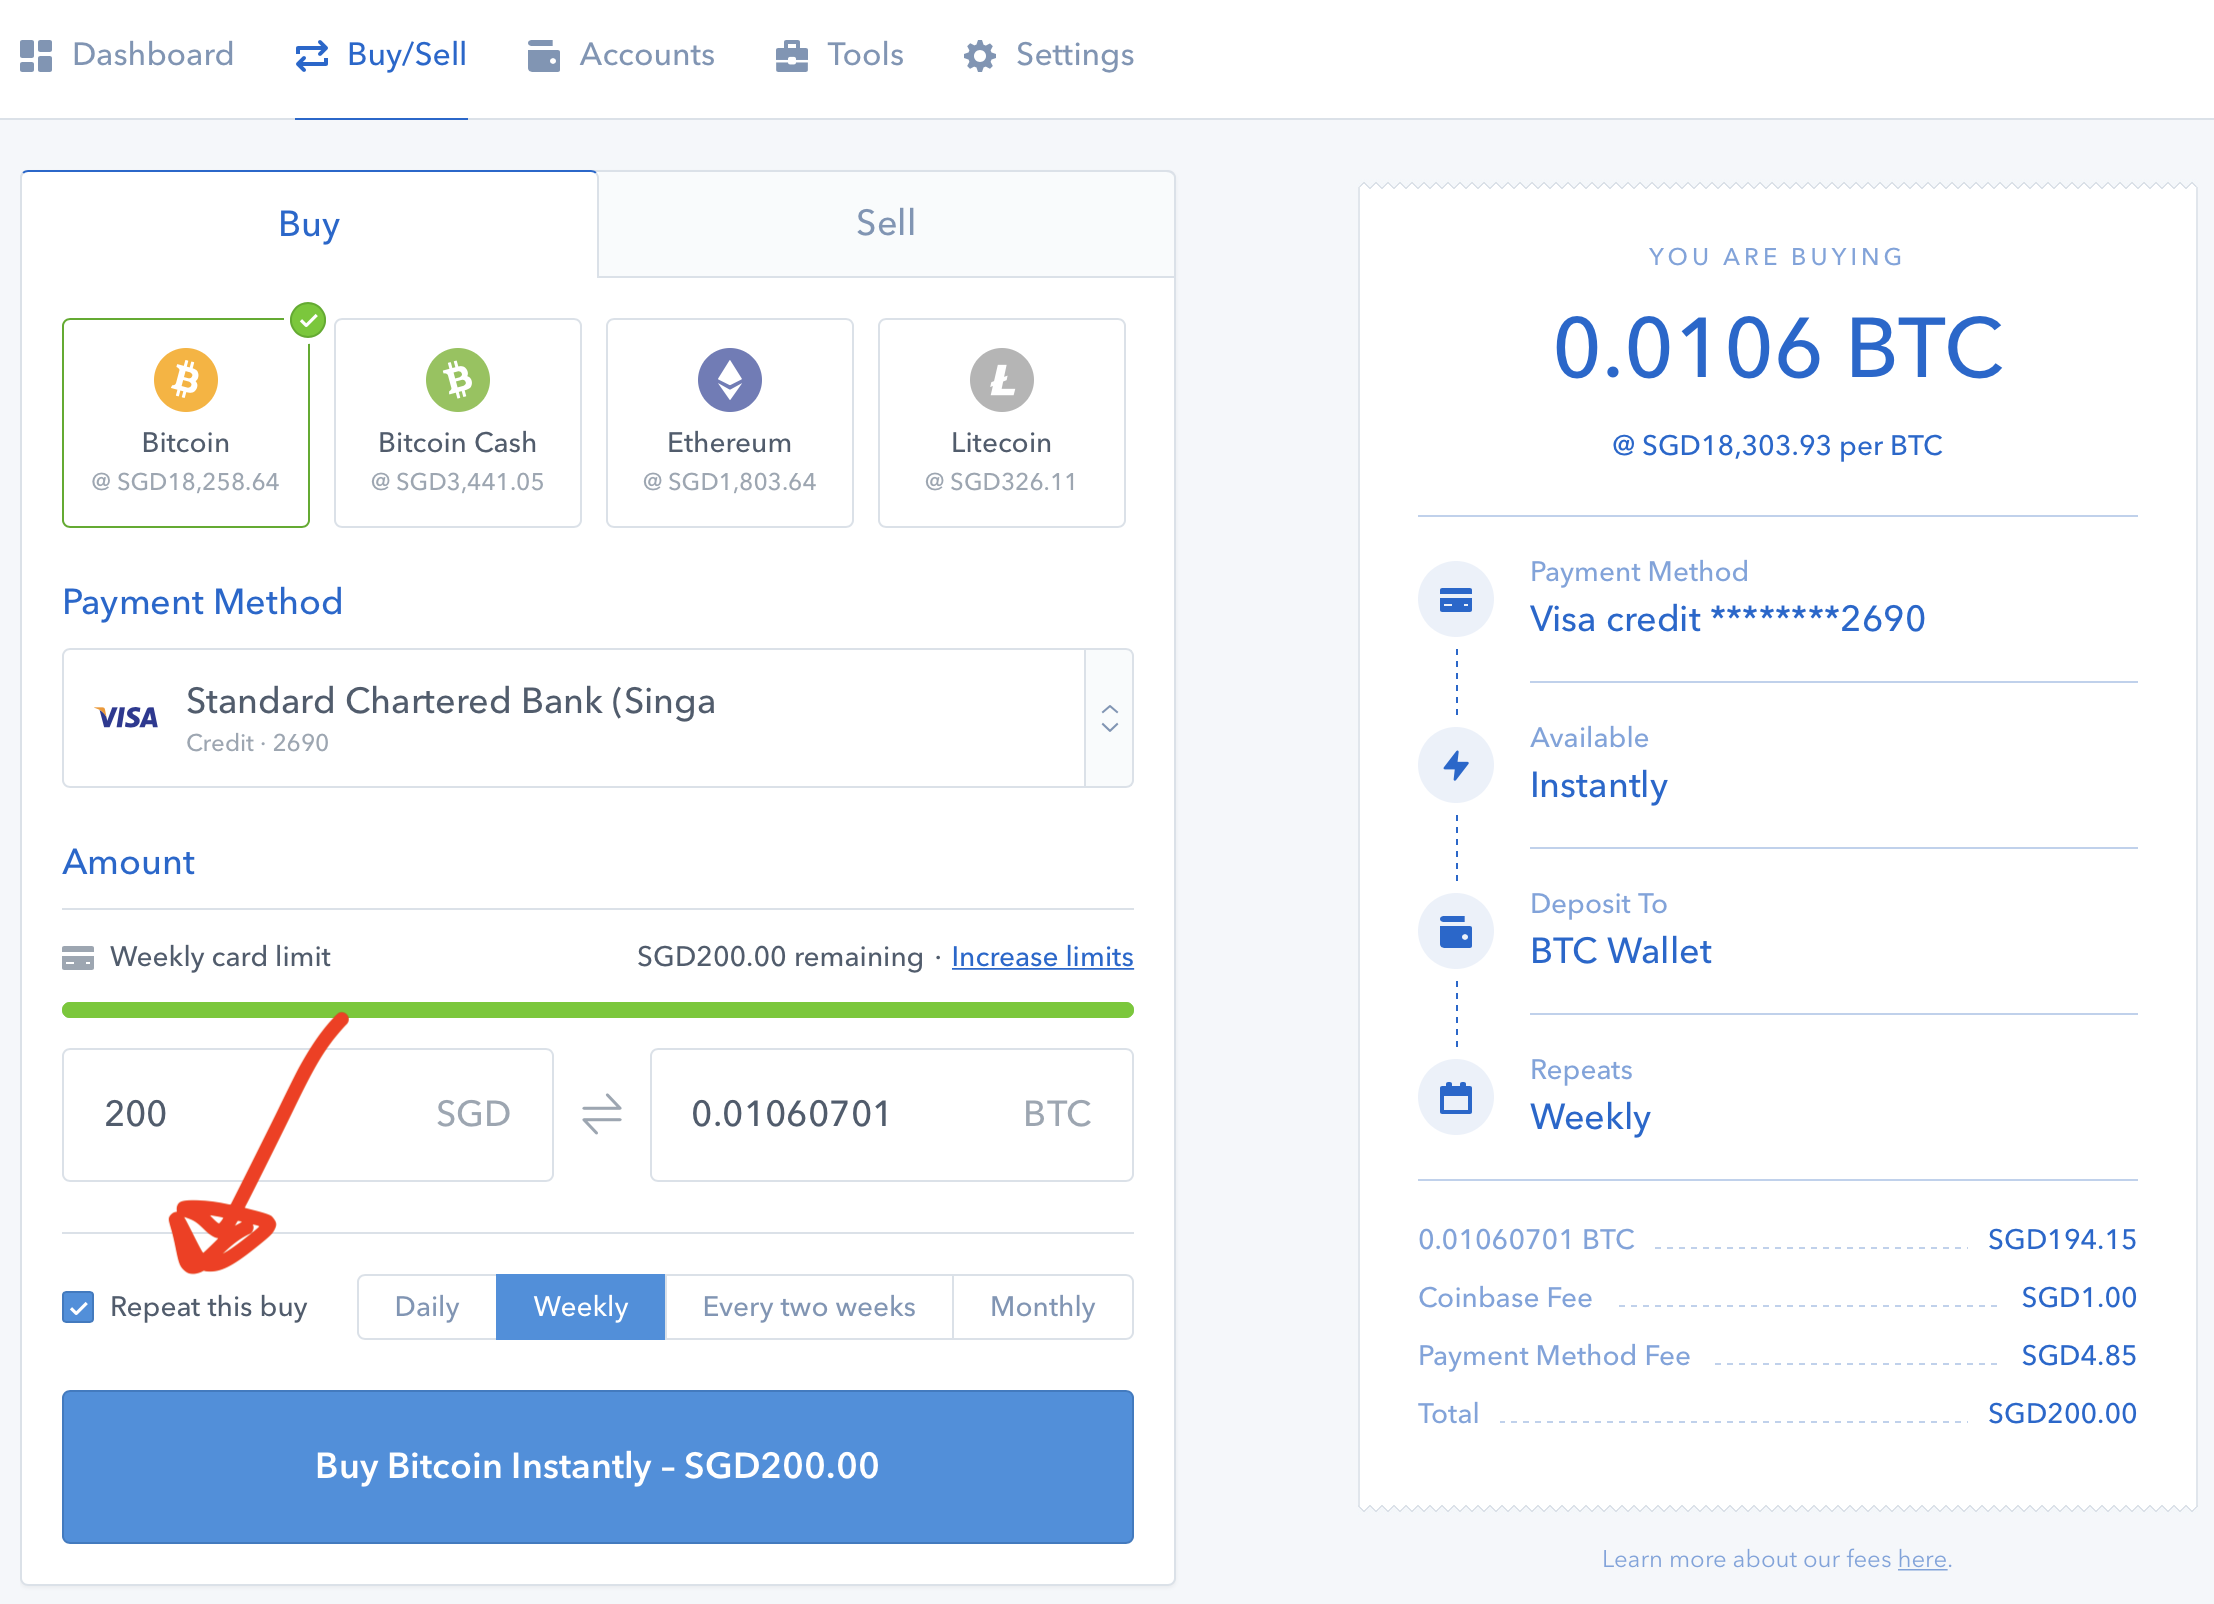
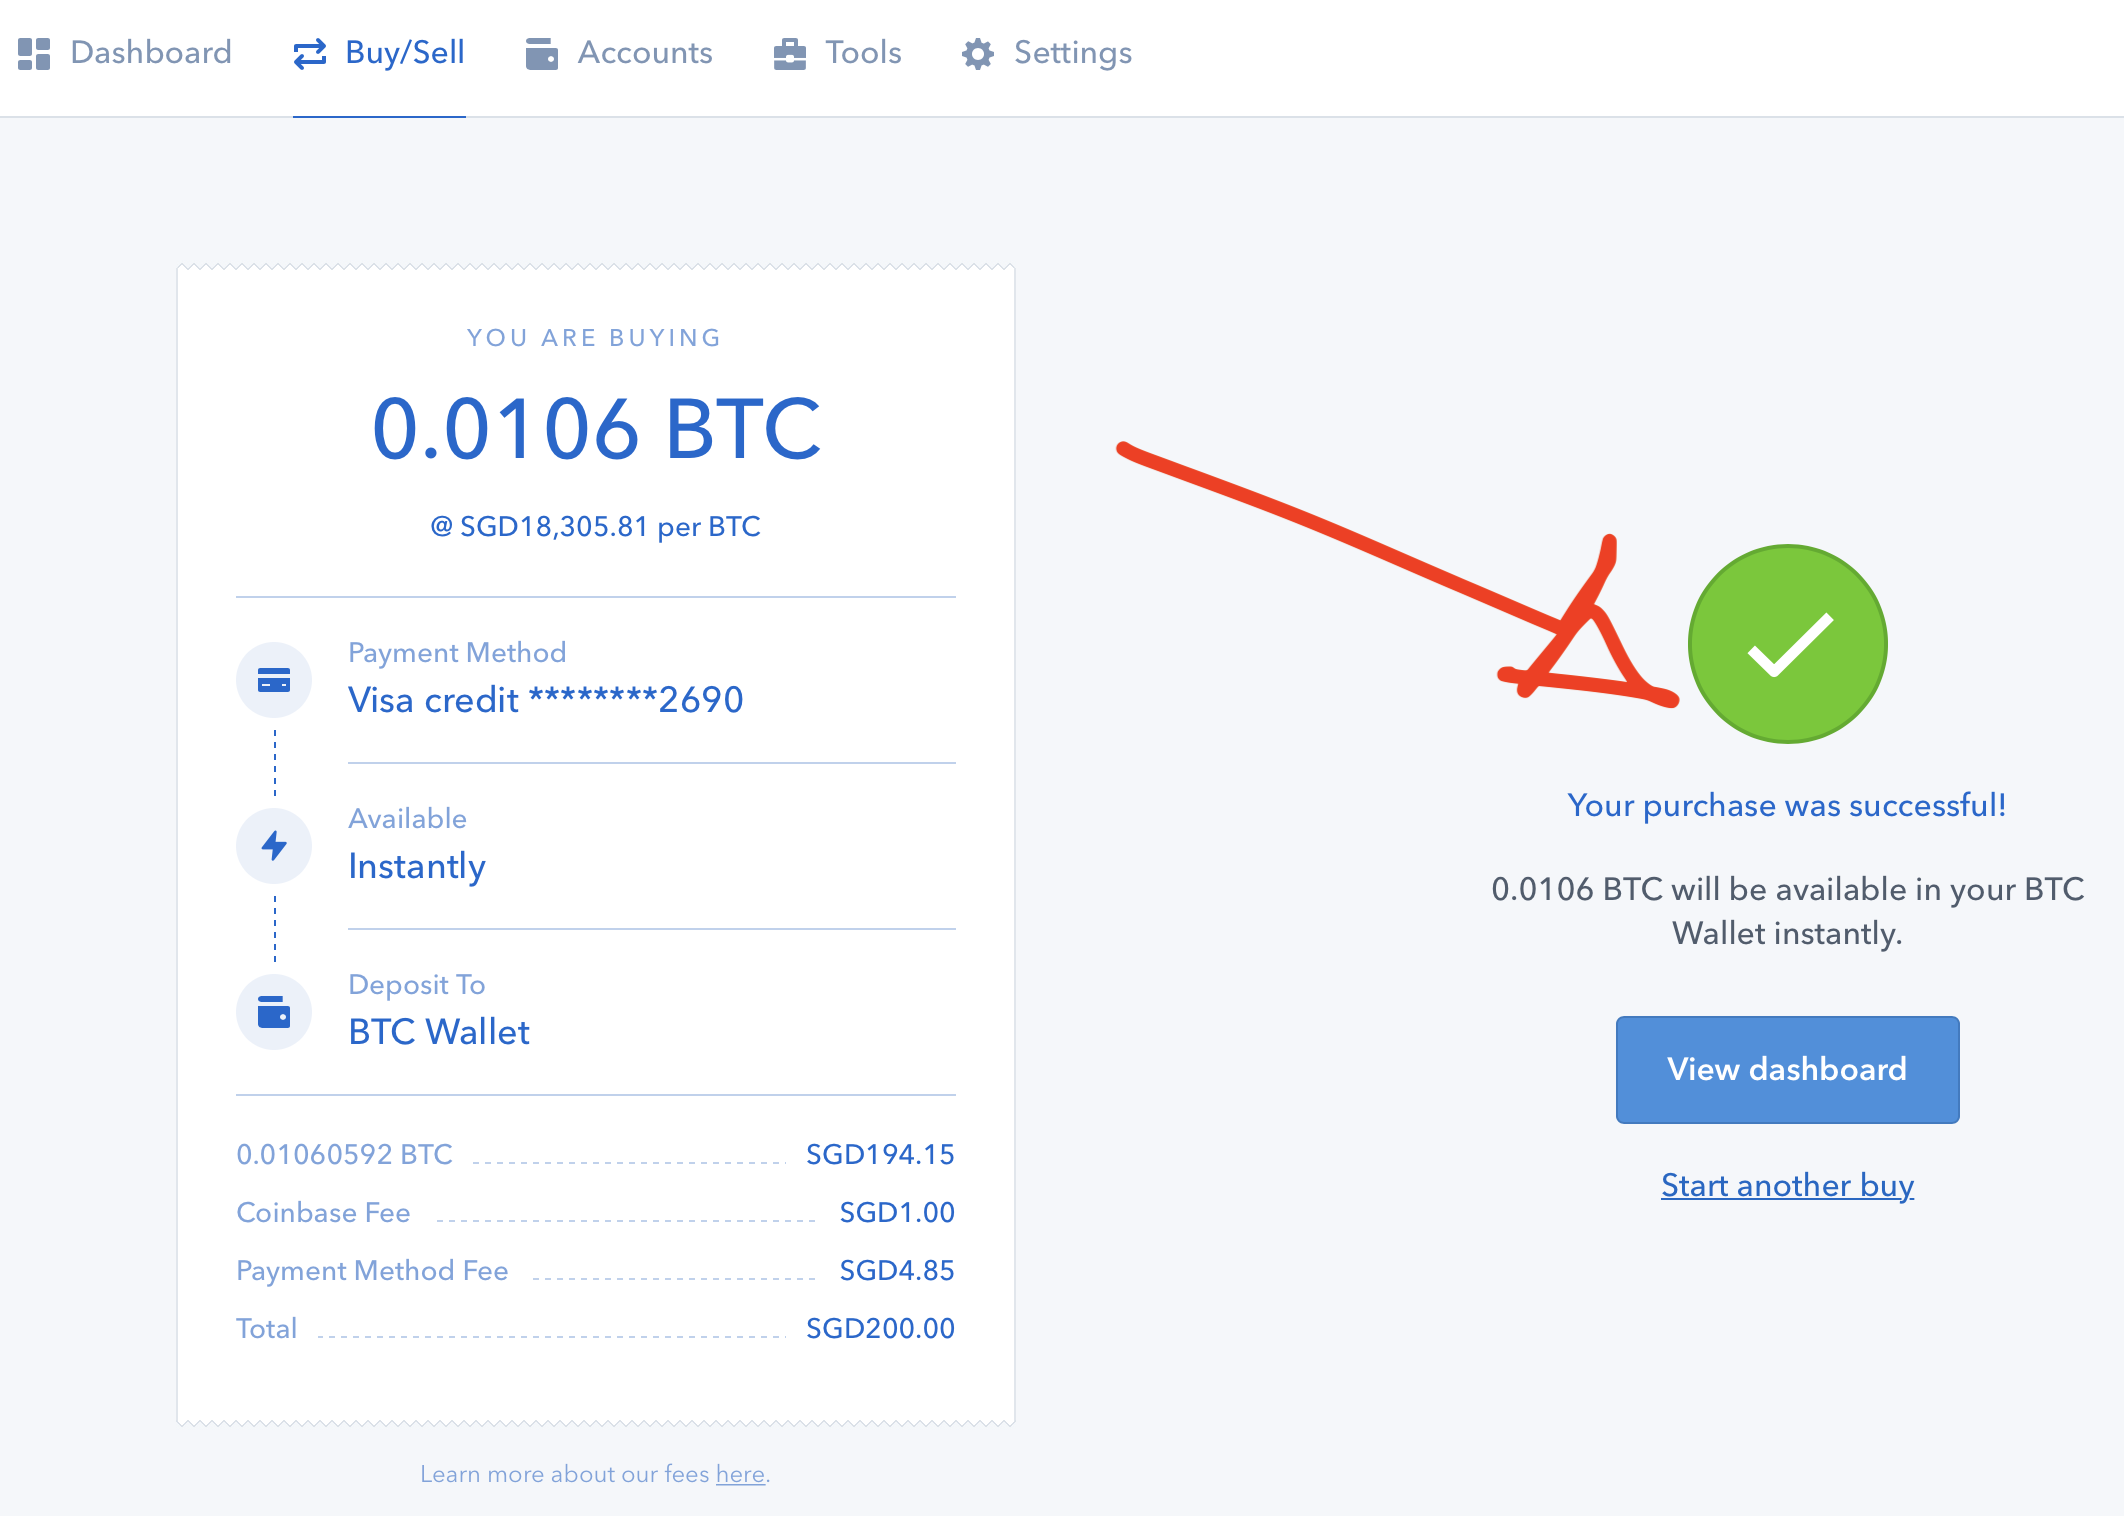
This process of transferring coins from Coinbase to Binance achieves three objectives. First, to convert your cash into bitcoin or ethereum at Coinbase. Second, to transfer these coins from Coinbase over to Binance. Third, once the coins arrive at Binance, to trade and convert these coins (bought from Coinbase) into hundreds of different cryptocurrencies (aka altcoins). Now you can trade almost everything in the world of cryptocurrency!
STEP #7 → Transfer coins from Coinbase to Binance
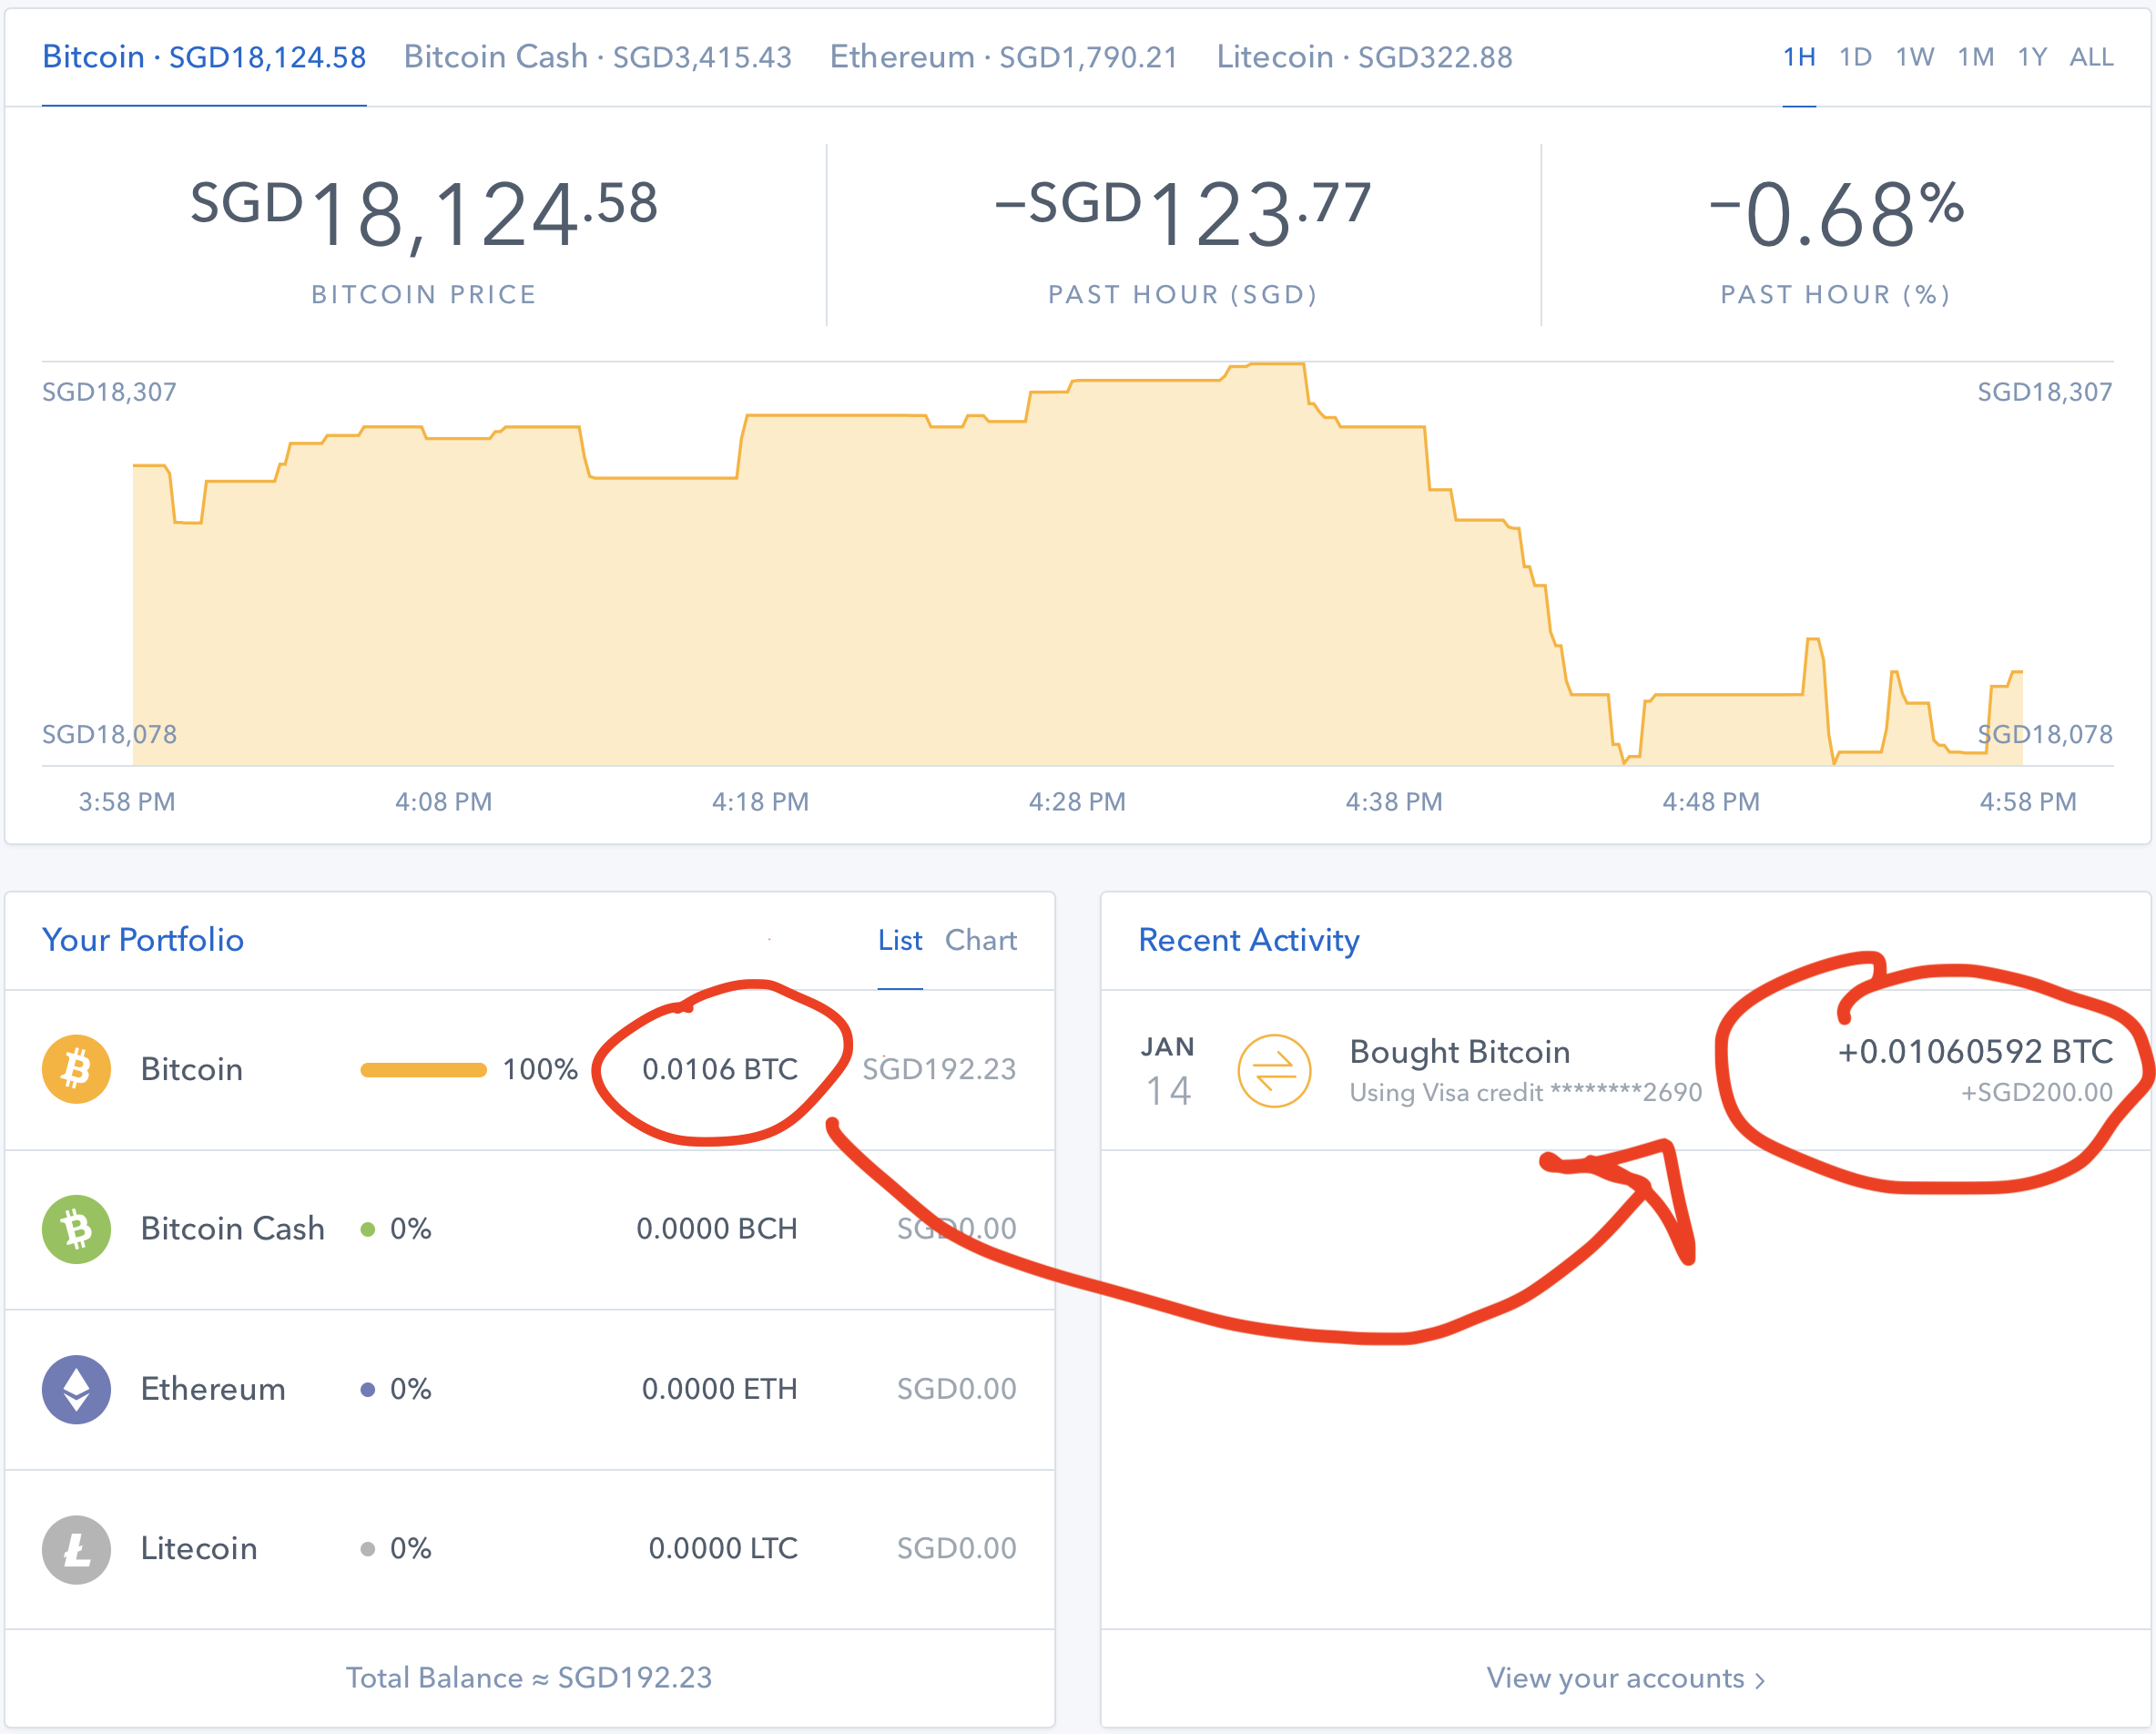
Now that I own bitcoins in Coinbase, I will transfer them over to Binance.
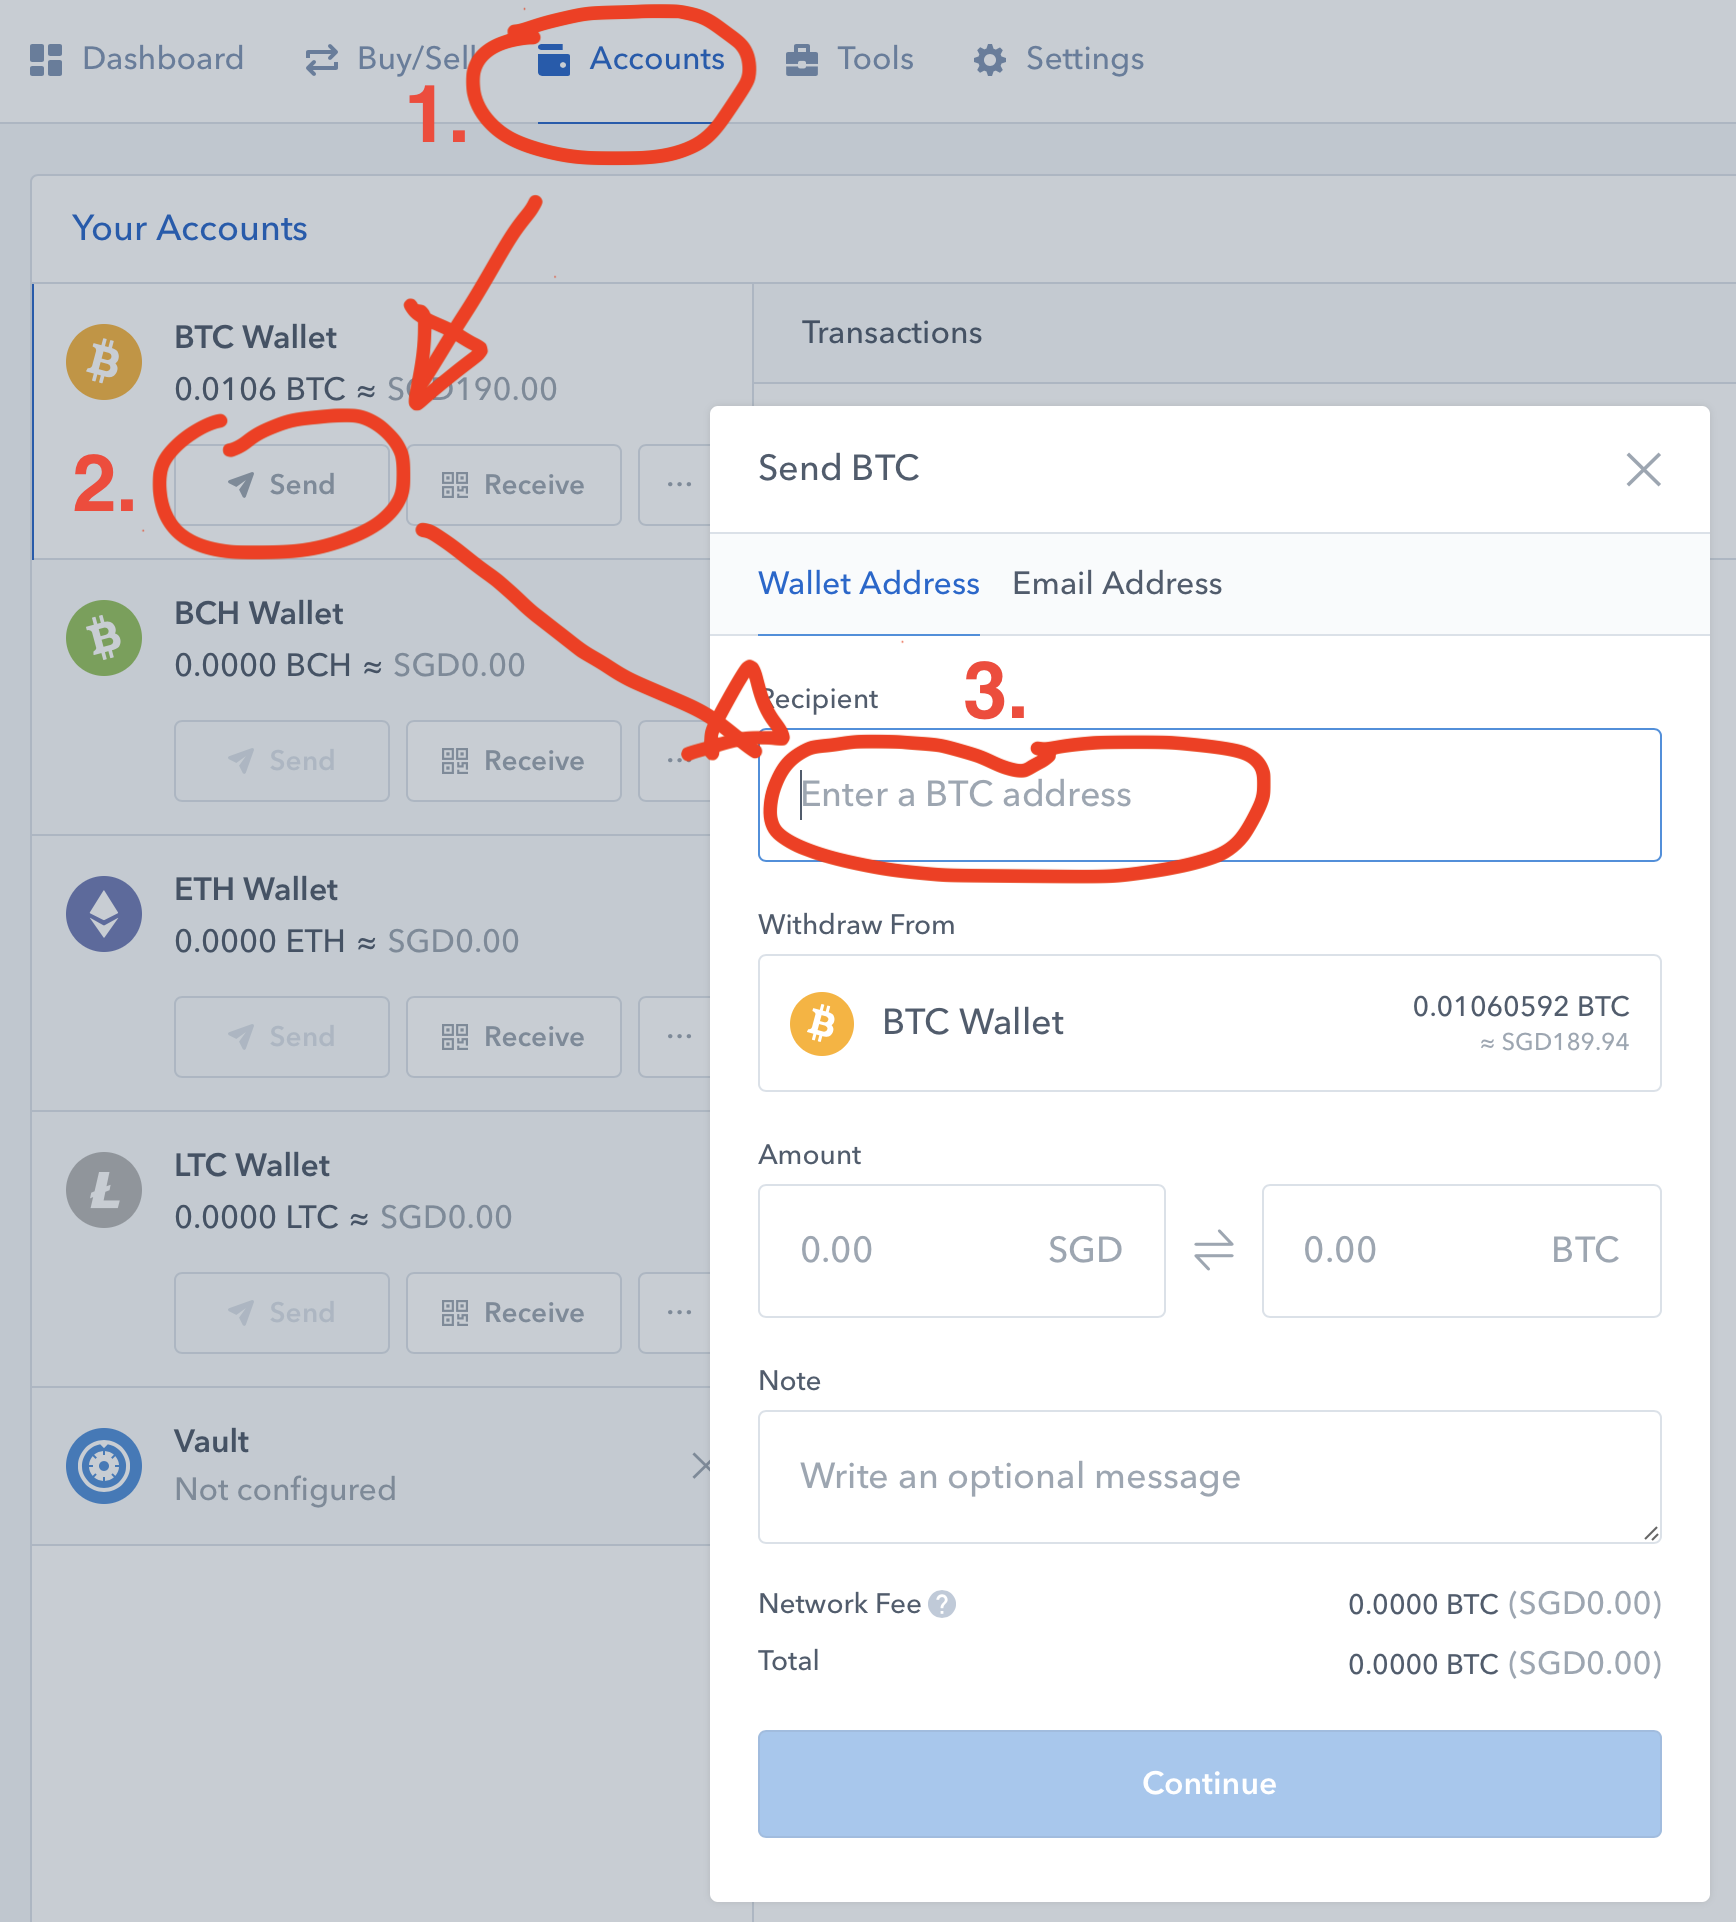
- Go to Accounts in Coinbase.
- Click “Send” in the BTC Wallet (since I own bitcoins).
- In the pop-out box, enter the BTC address from Binance.
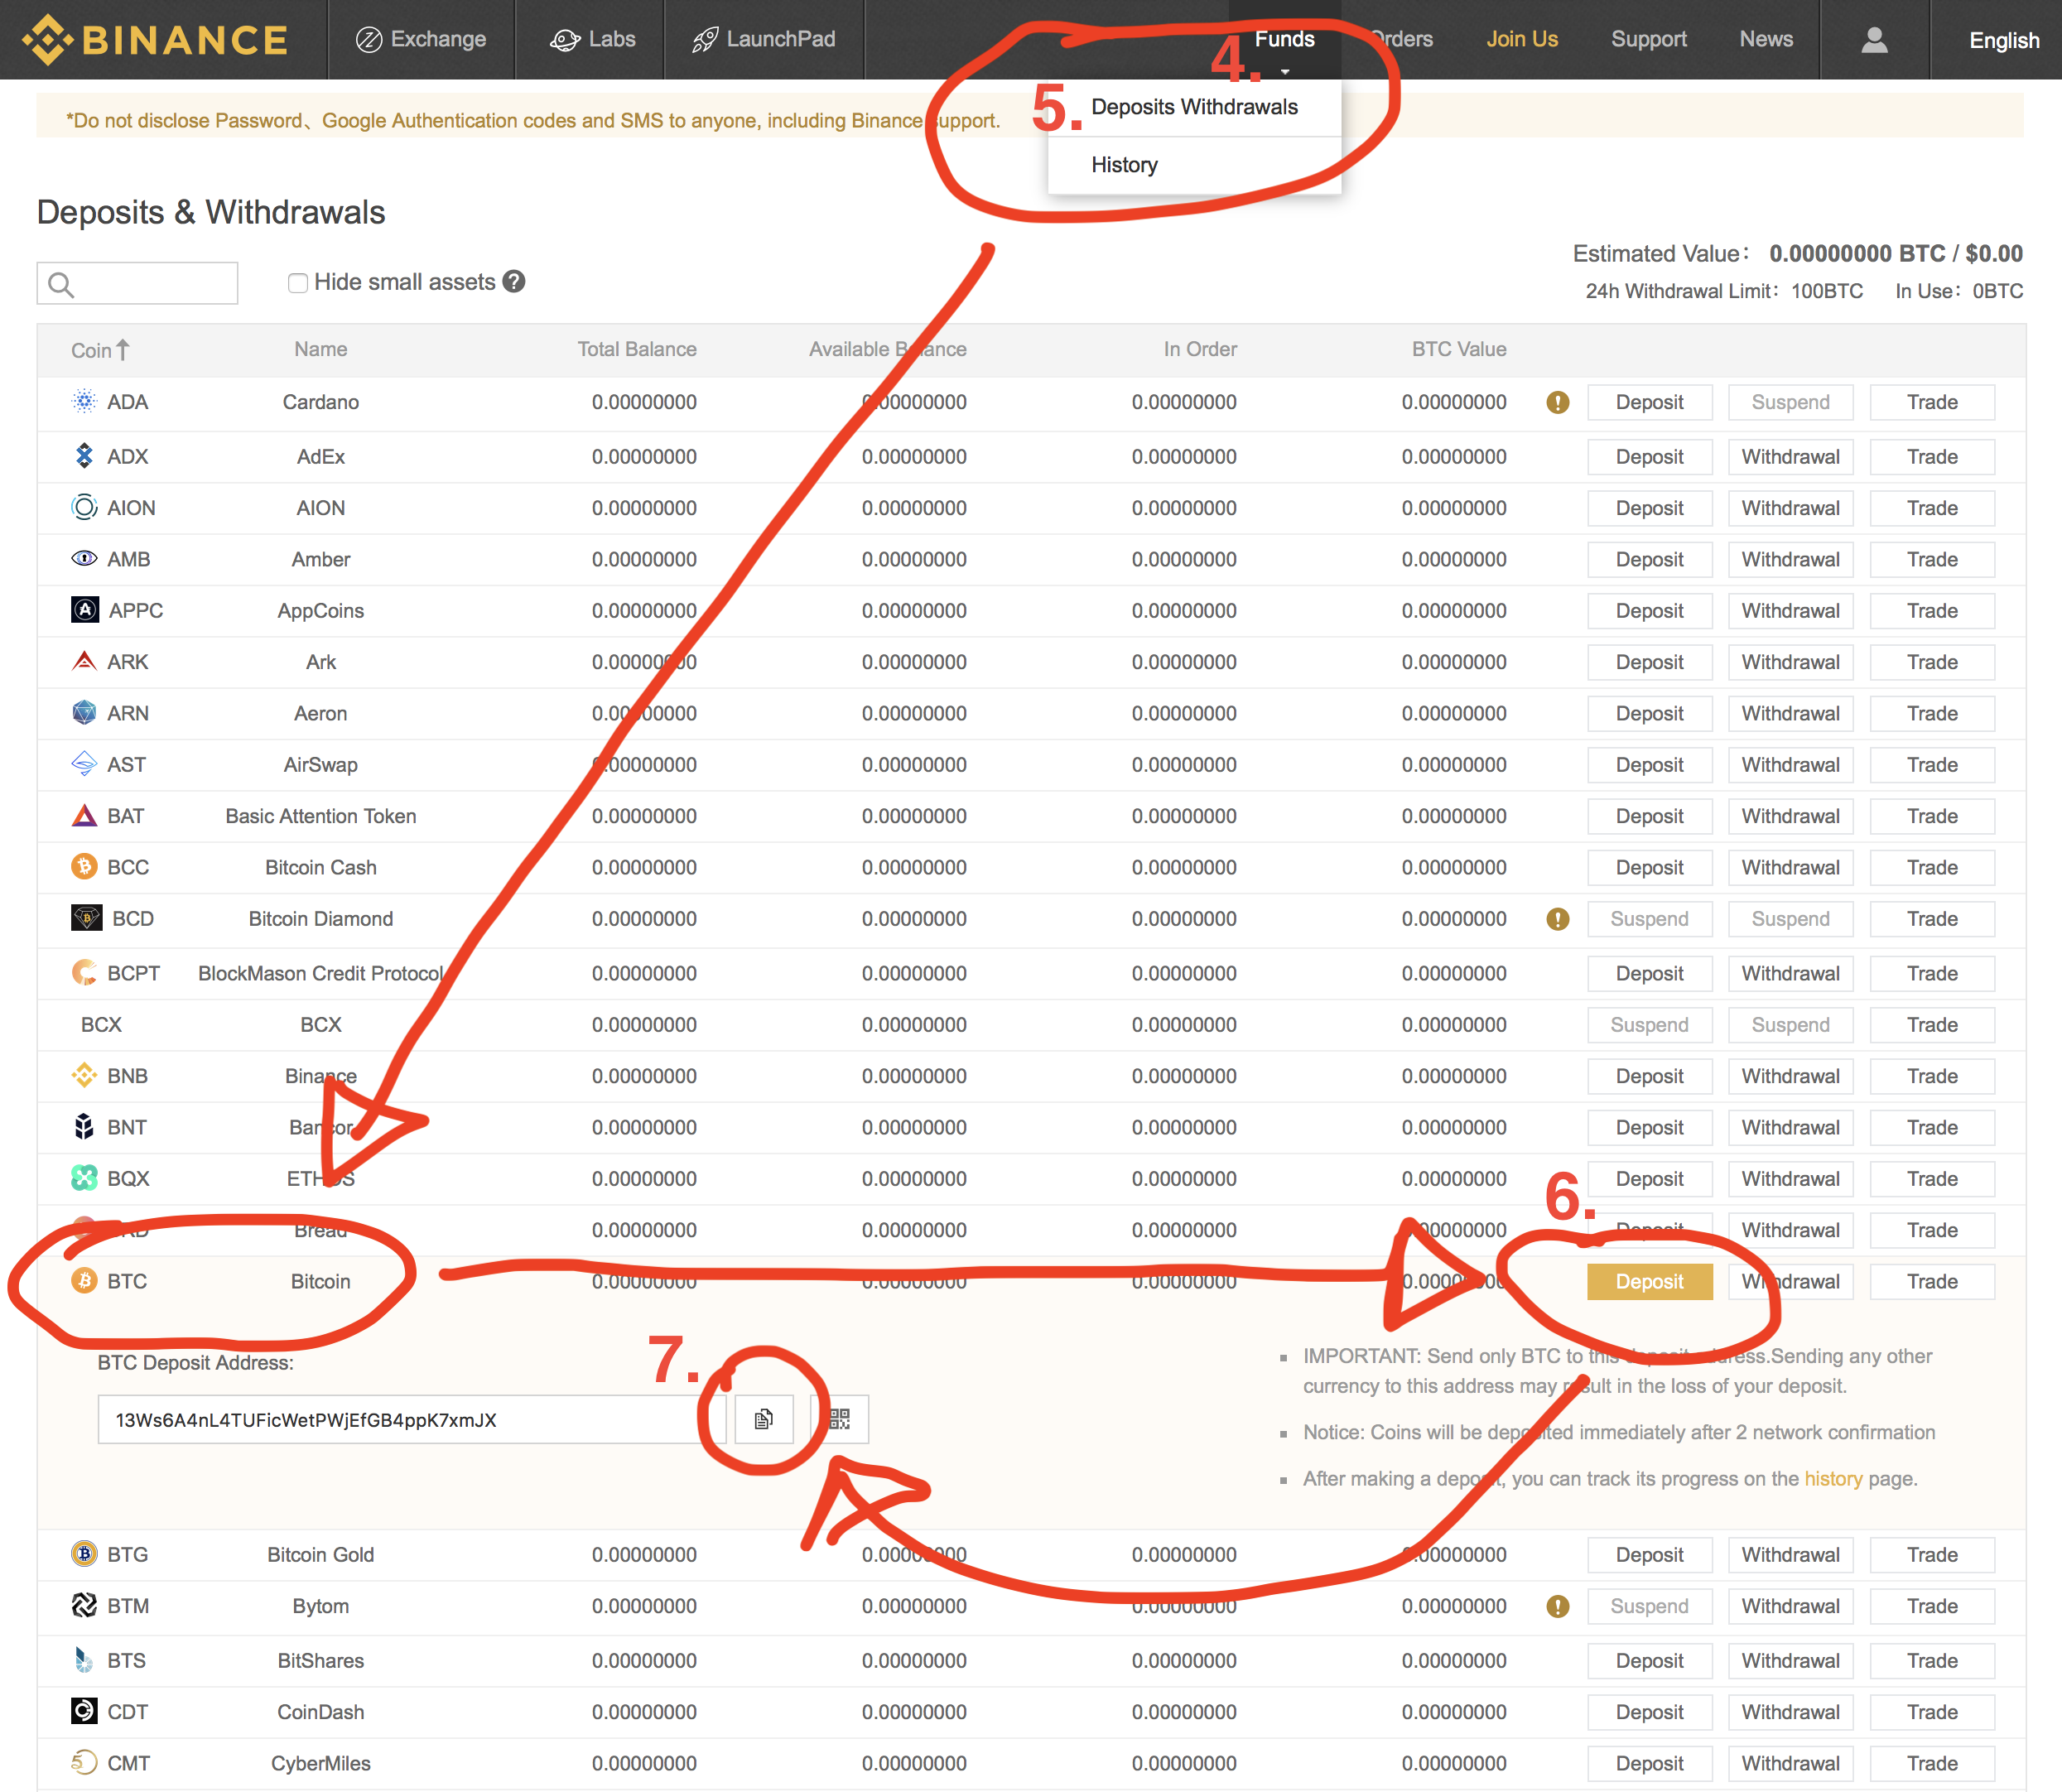
4. To find the BTC address in Binance, go to Funds at the top bar.
5. Click “Deposits Withdrawals”.
6. On the same row “BTC Bitcoin”, go to the right side to click “Deposit”.
7. BTC Deposit Address shows up and click the “copy” icon.
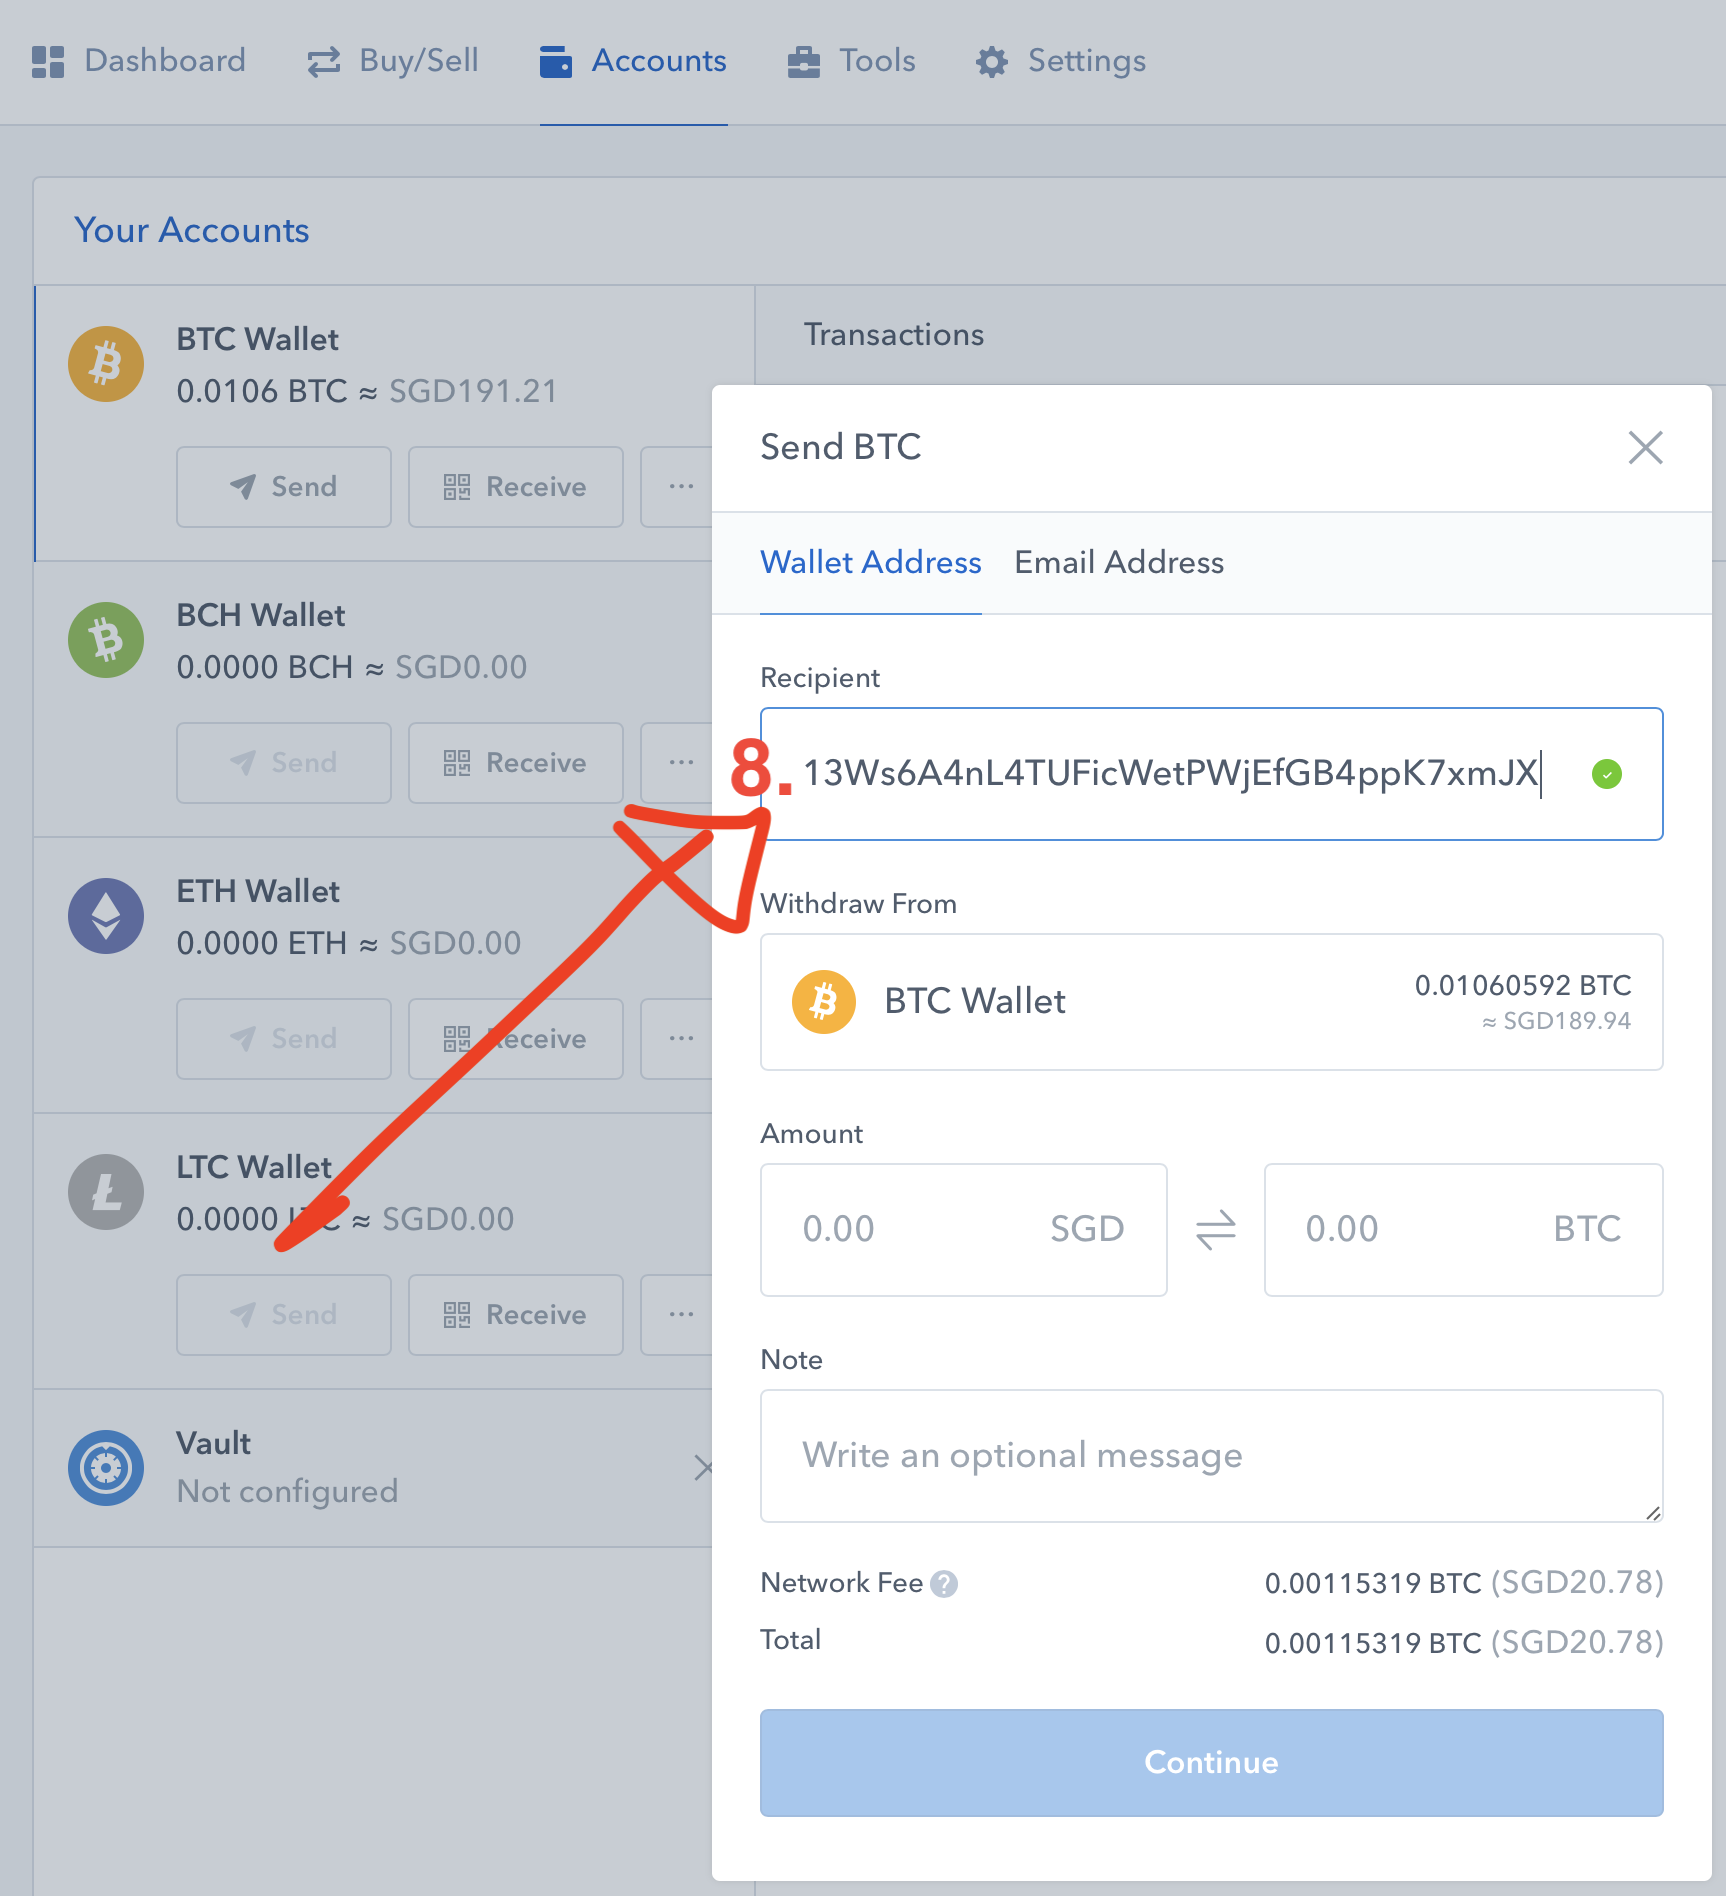
8. Go back to Coinbase to paste the BTC Deposit Address into the “Recipient”.
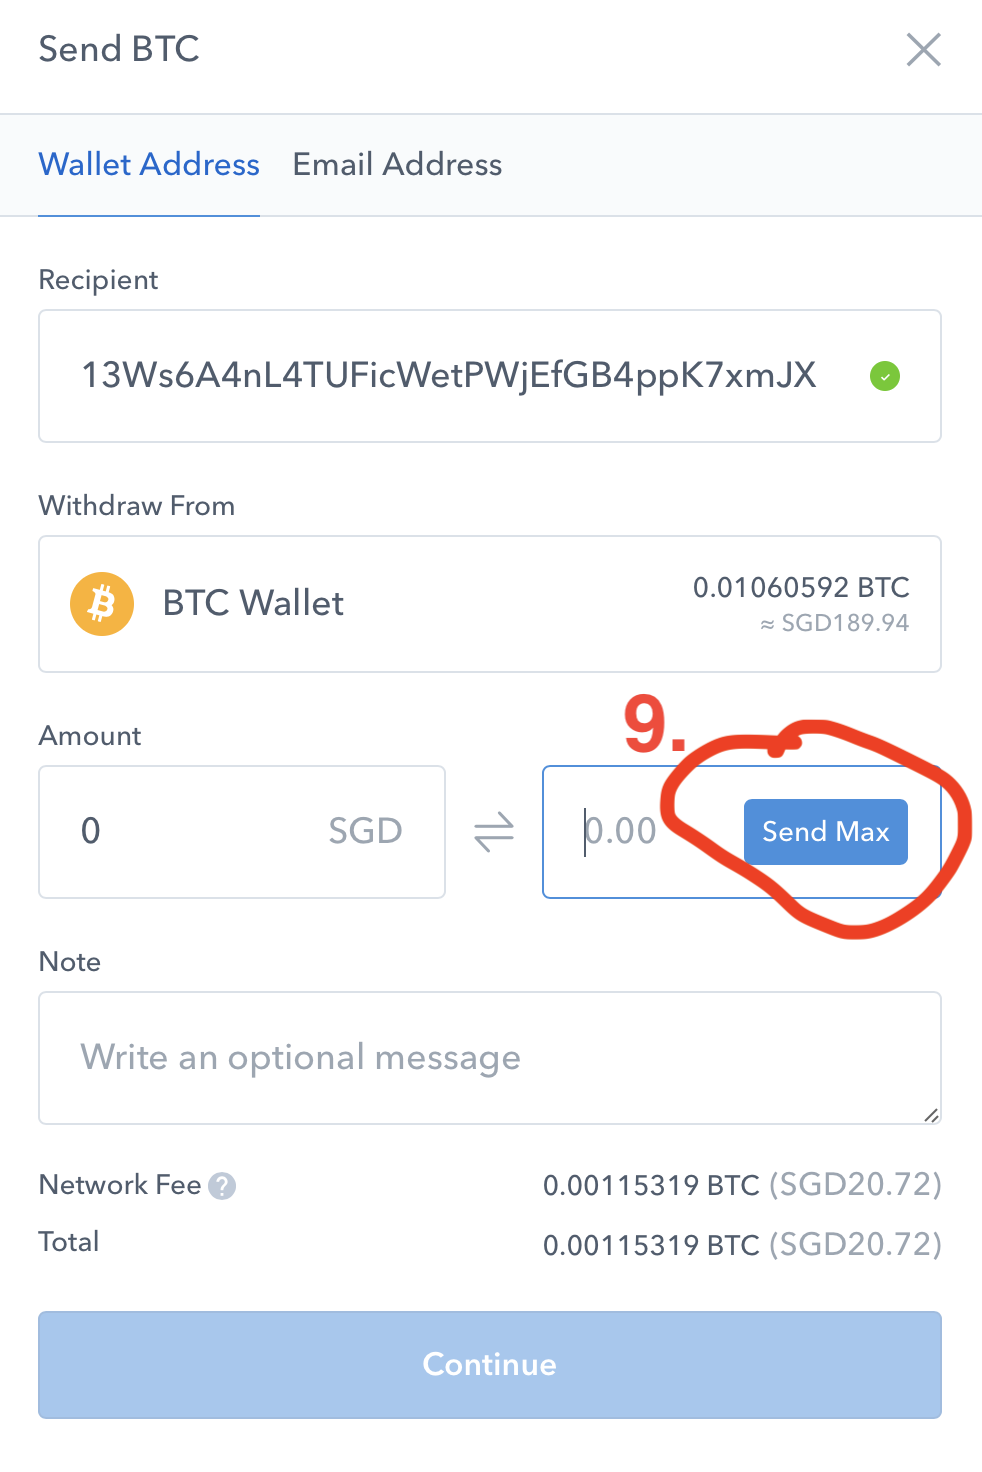
9. Under Amount, click inside the right-side box “BTC”. A box with “Send Max” will appear. I clicked “Send Max” because I wanted to transfer all the bitcoins inside Coinbase over to Binance.
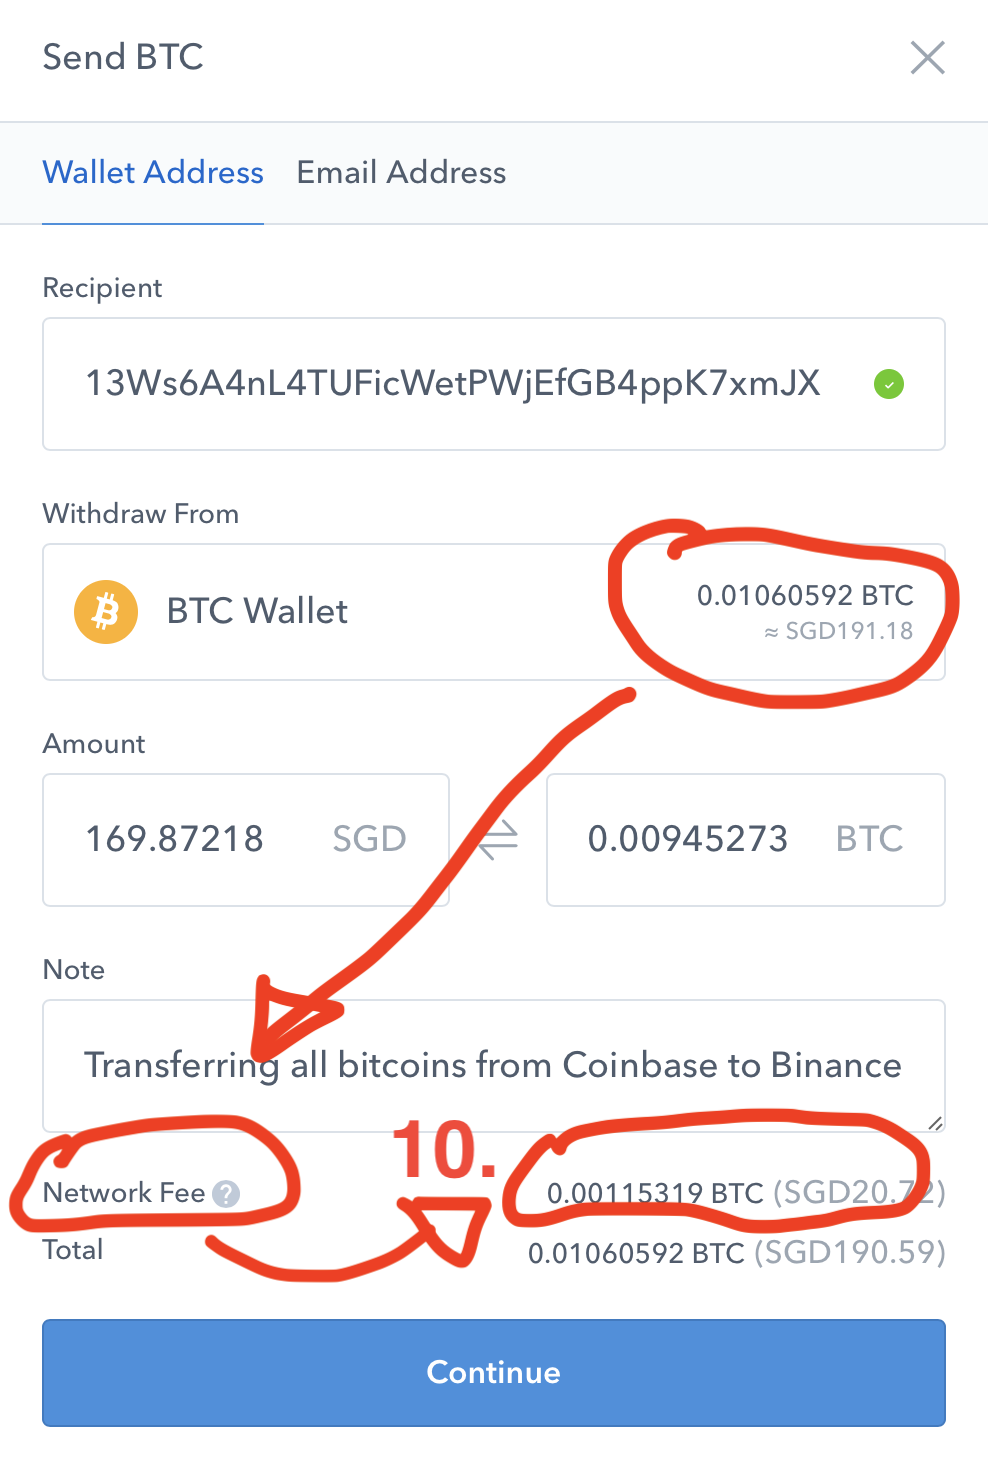
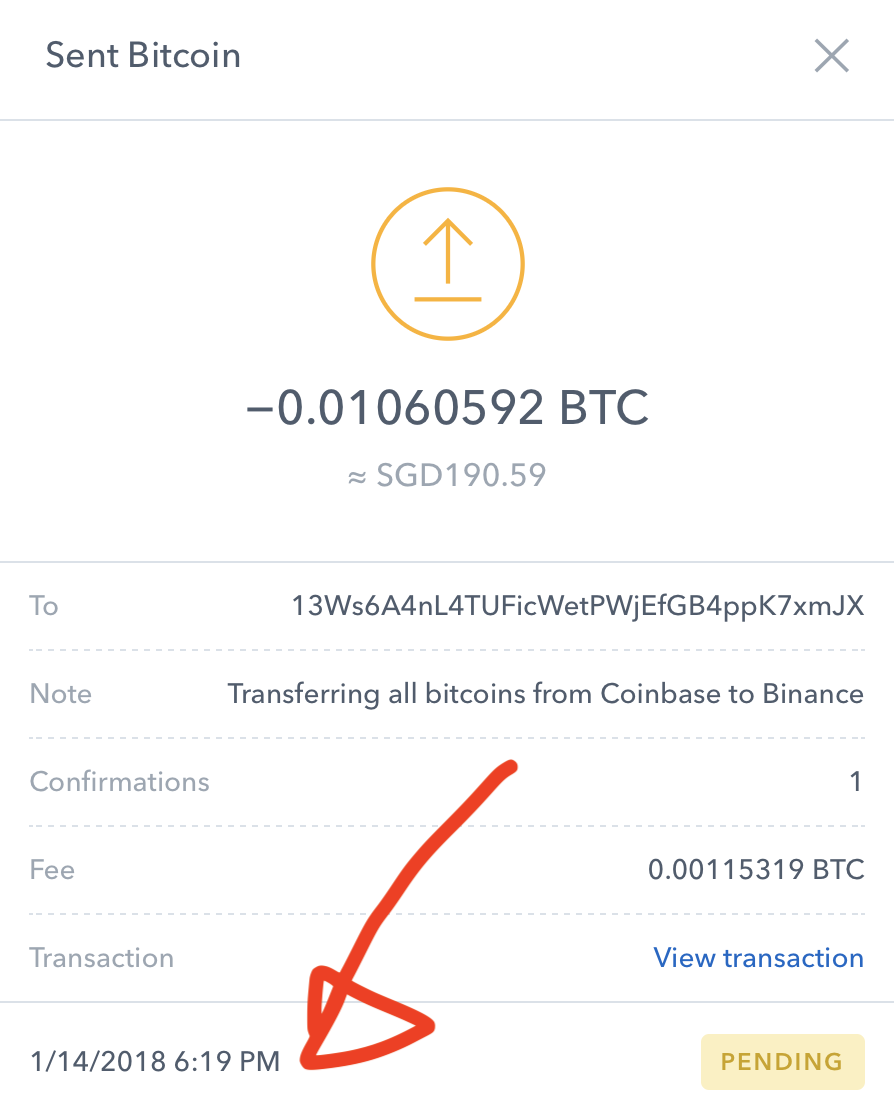
10. Notice that my original bitcoins value has dropped from 0.01060592 BTC to 0.00945273 BTC (or the equivalent drop from S$190.59 to S$169.87 = S$20.72). Where did this 0.00115319 BTC or S$20.72 money go to?
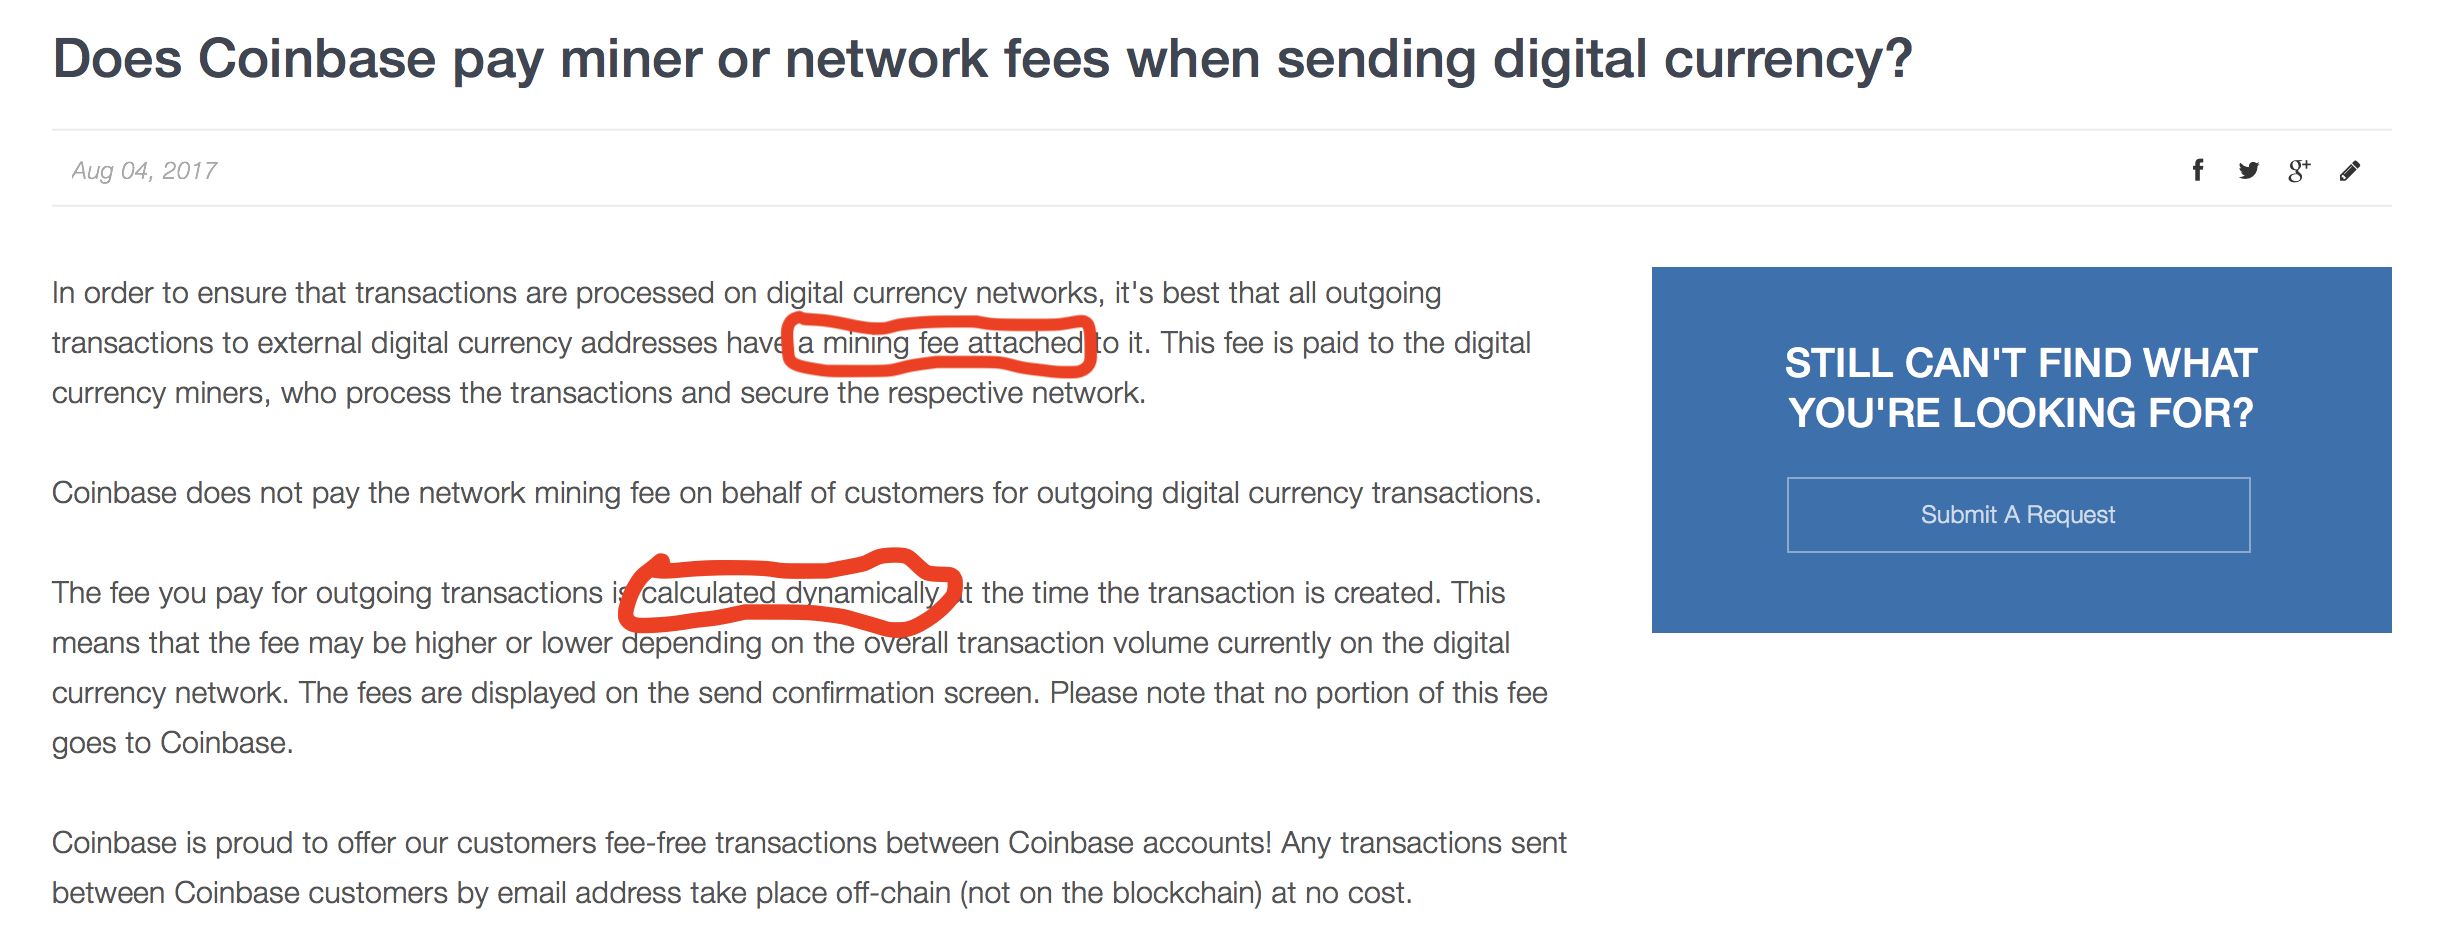
Solve the mystery by clicking the “?” icon next to Network Fee. Below article explains that there is a mining fee attached to the transfer and this fee is calculated dynamically (to pay the digital currency miners).
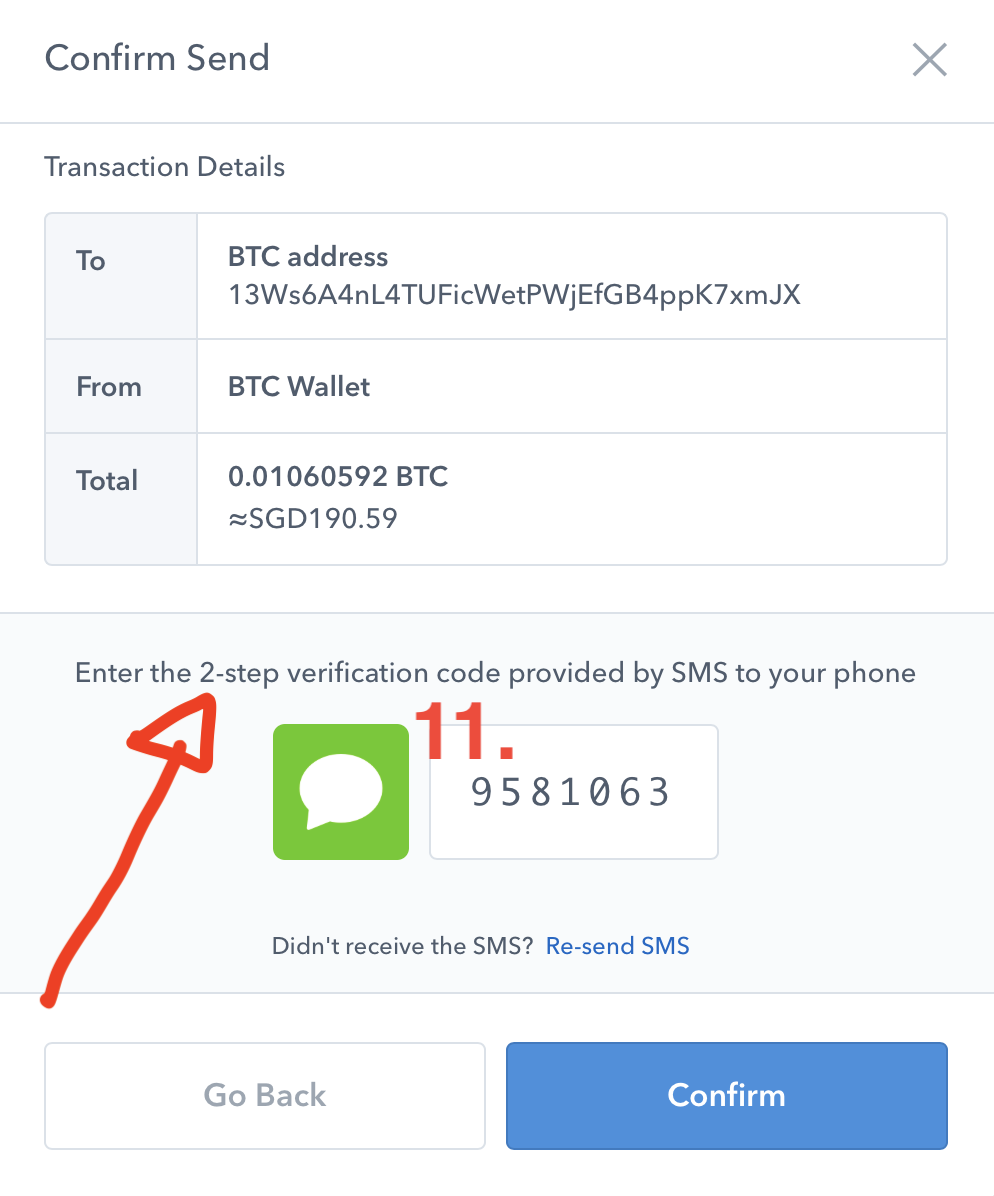
11. Final confirmation with entry of the 2-step verification code.
12. I transferred successfully but the status was pending. Let’s track how long this pending status will take to update. Pending since 14 Jan 2018 at 6.19pm.

Once the incoming bitcoins arrived in Binance, you can proceed to buy altcoins and start trading more than 100 different cryptocurrencies. Let’s check if my bitcoins had arrived?
Yes!!!

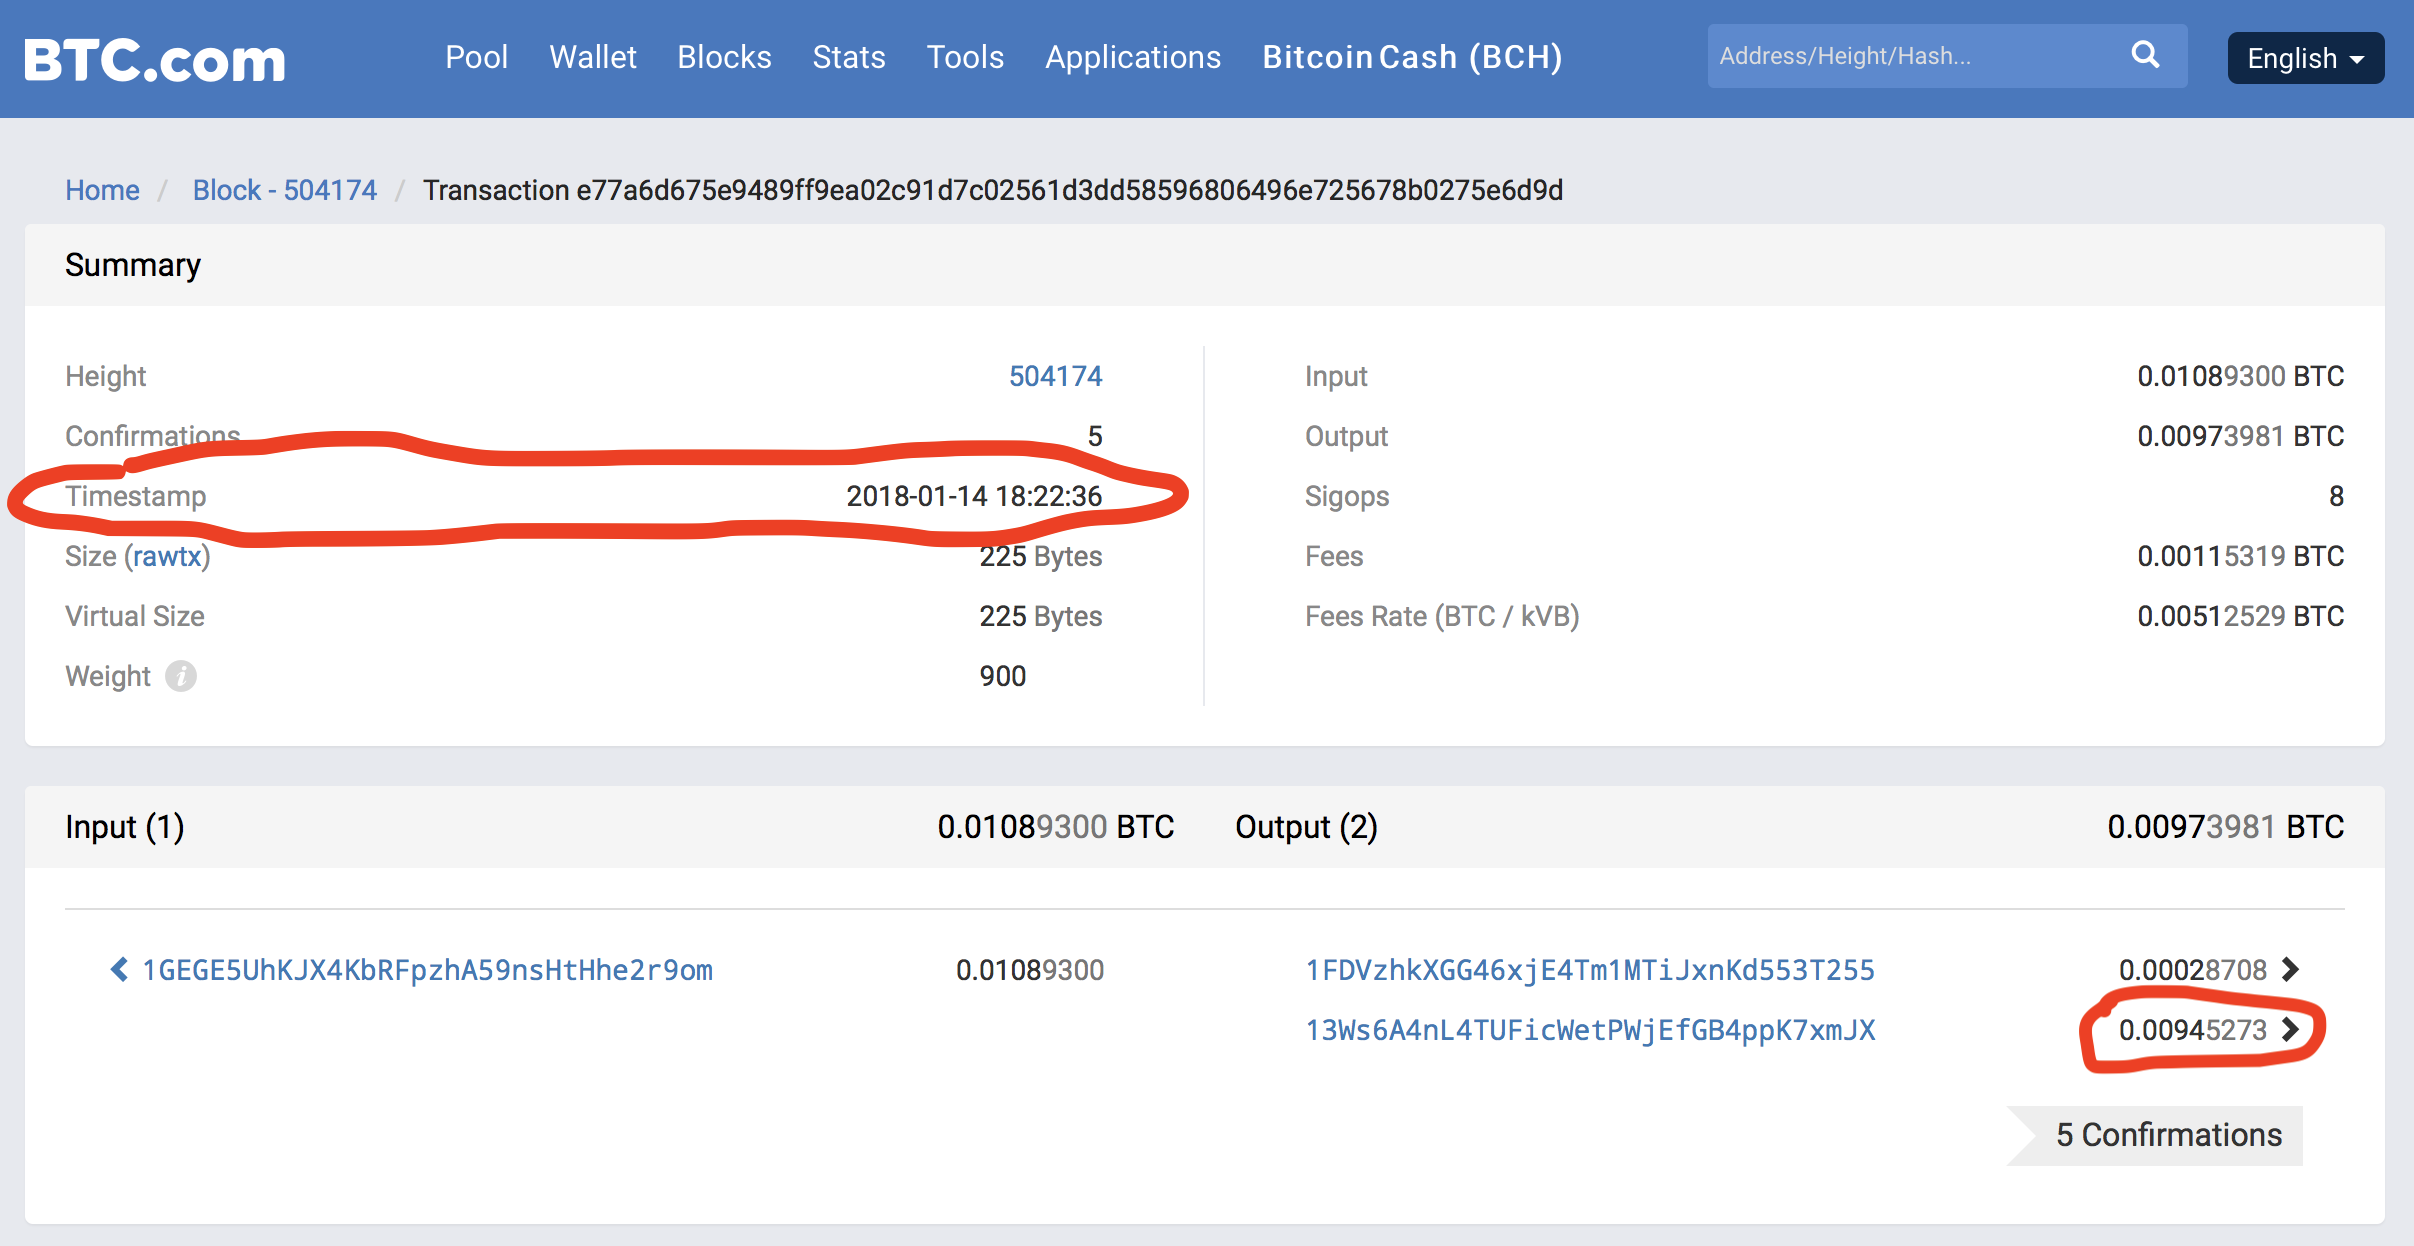
I clicked “Check” in Binance (above) to find out more in the BTC.com website (below). I double checked to ensure that the number of bitcoins wascorrect at 0.00945273 BTC. The number of bitcoins will not change; but the price of bitcoins had changed significantly in such a short time!
Finally, I went back to Binance to click on Funds (Deposits Withdrawals). The number of bitcoins is displayed correctly under “Available Balance”.

Now we can start buying altcoins!
STEP #8 → Buying altcoins at Binance for the first time
I like to see the competition hots up between the two key players: Bitcoin BTC versus Ripple XRP
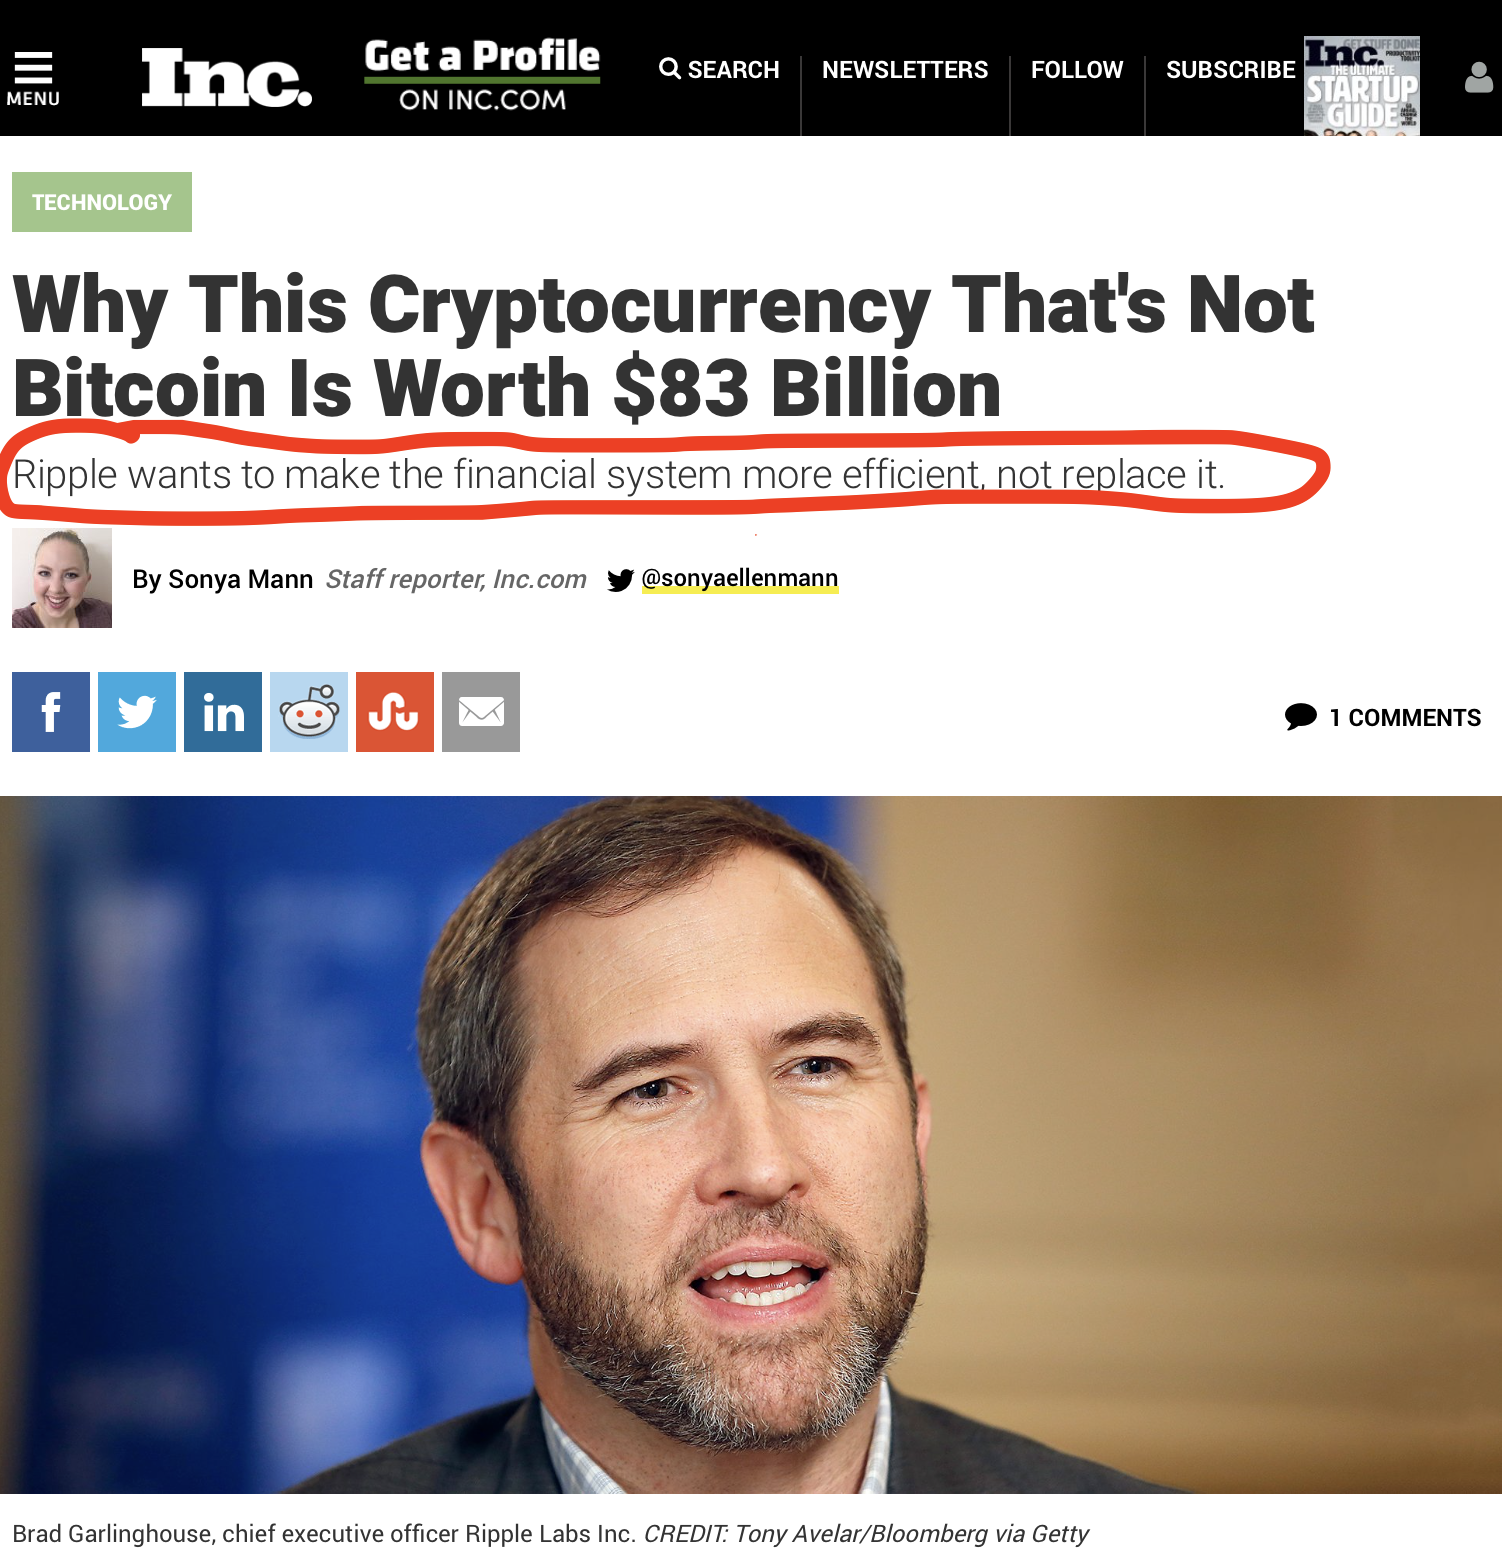
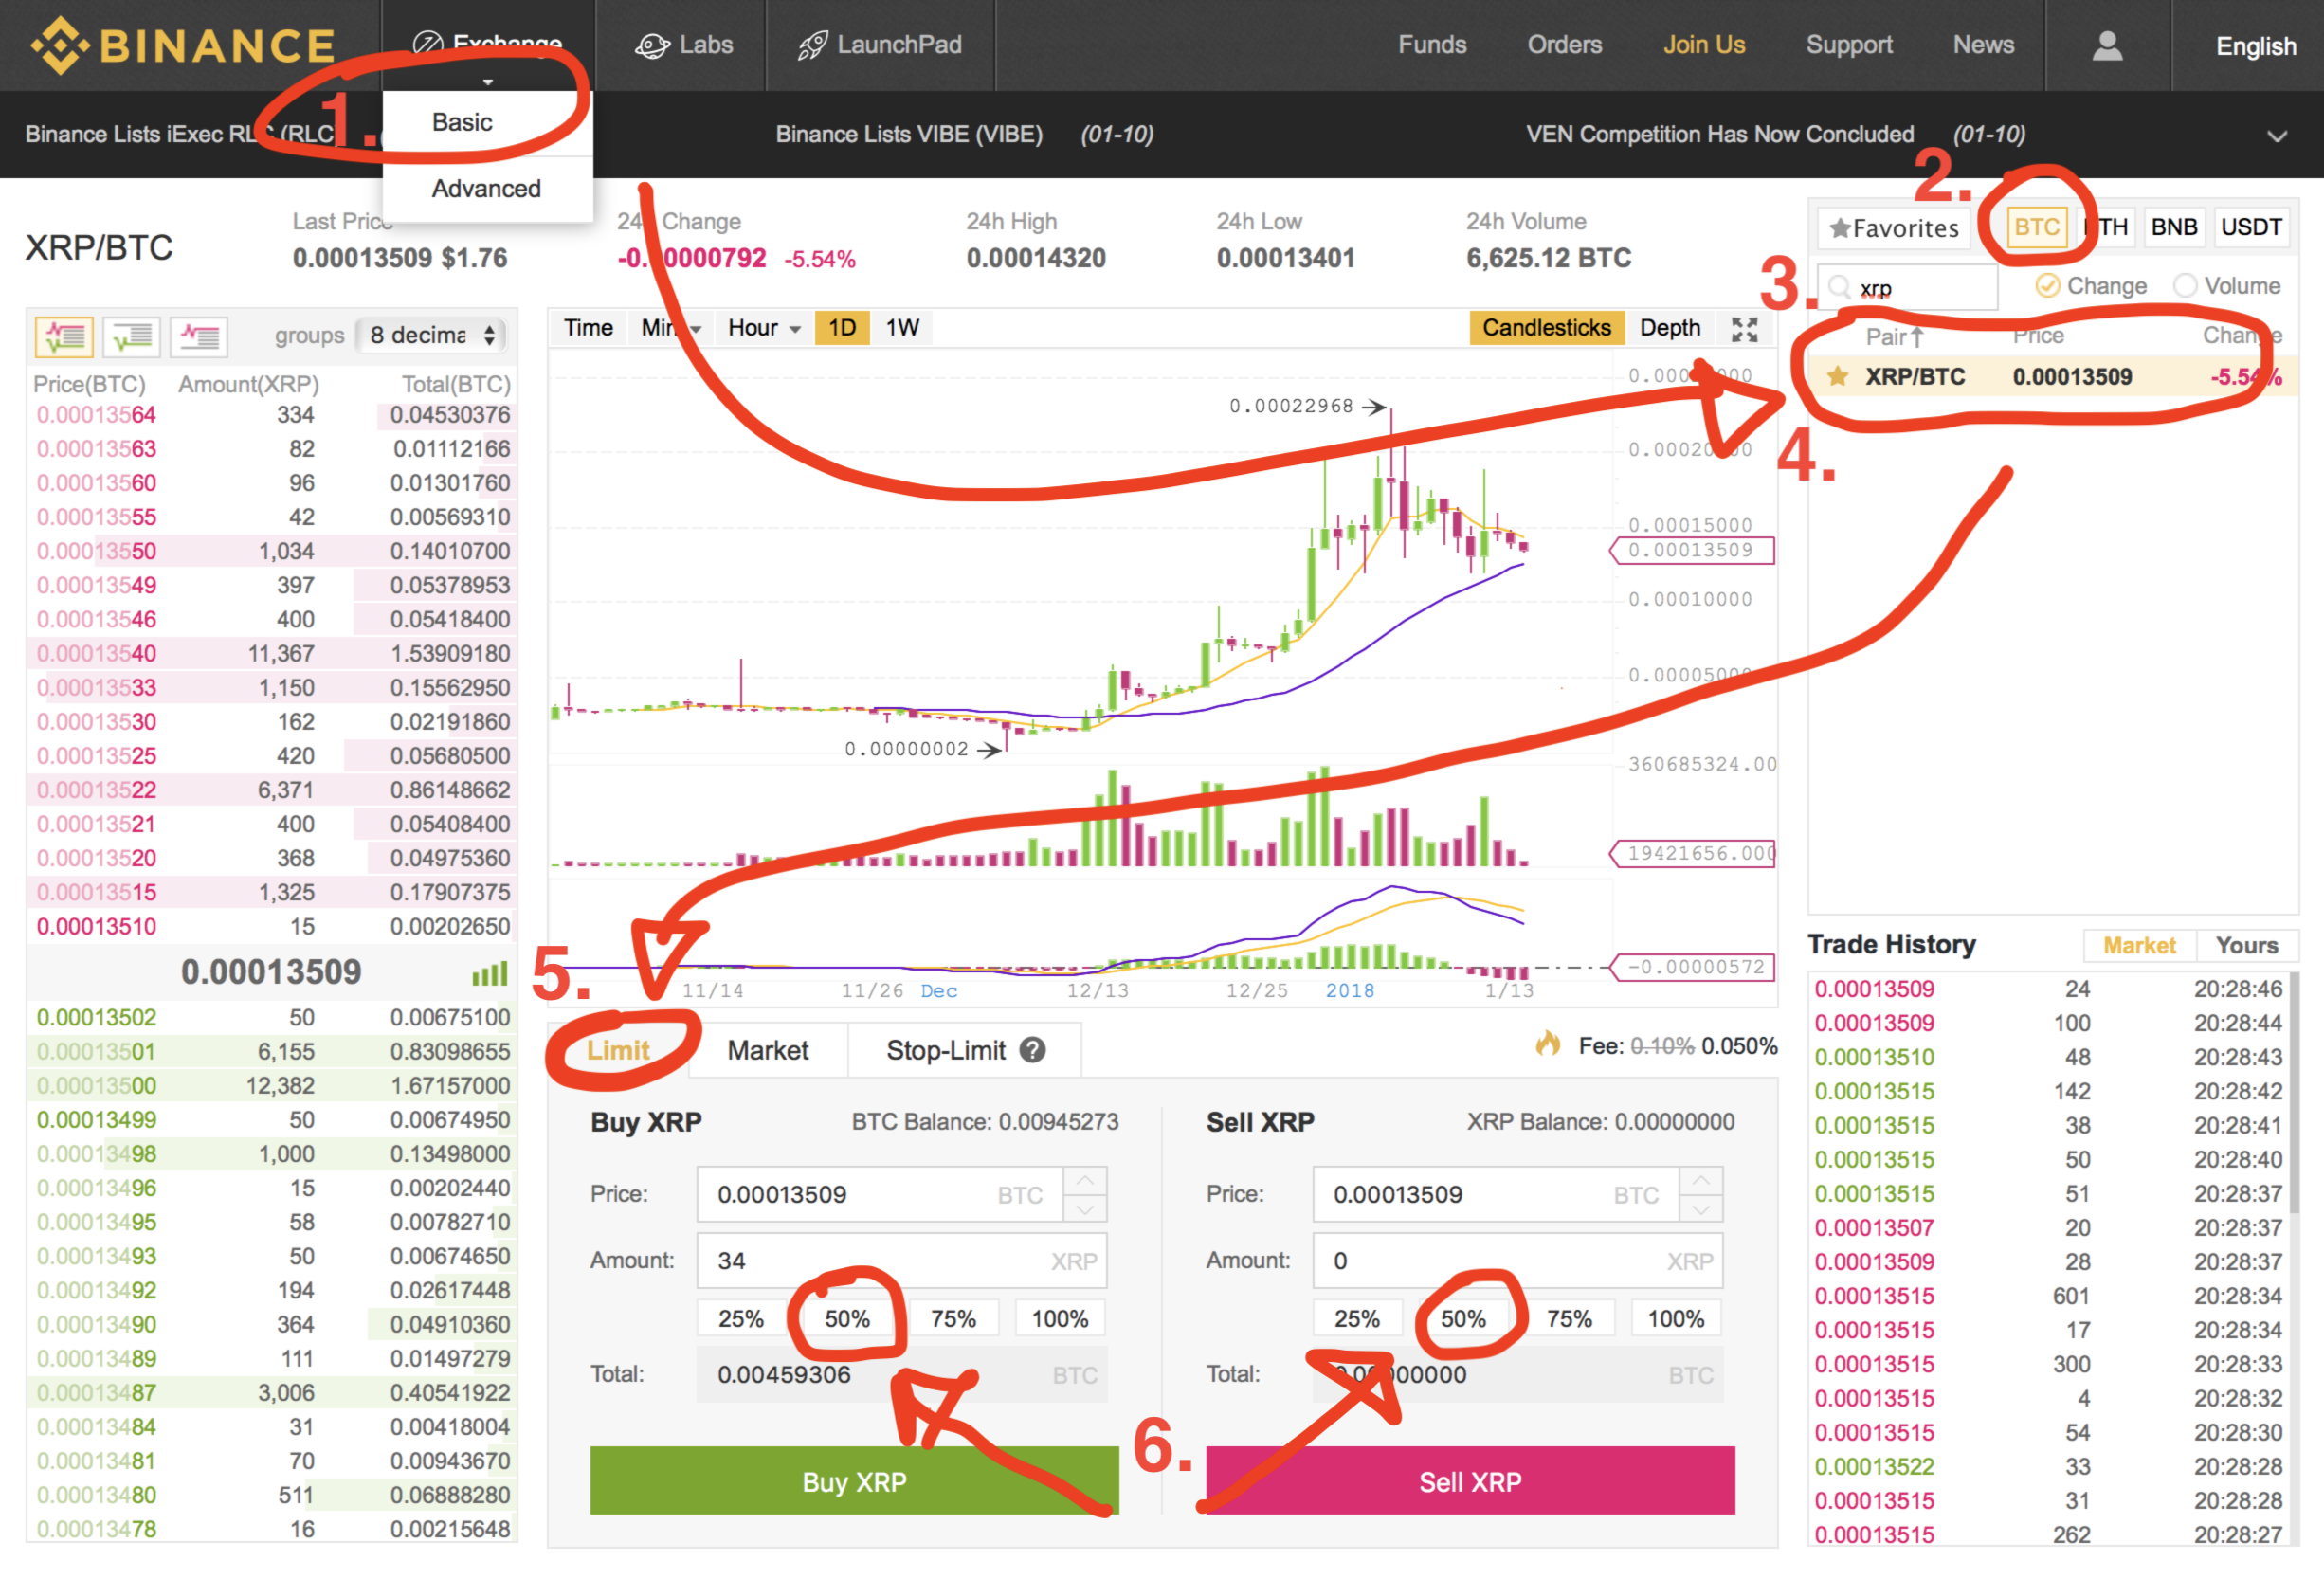
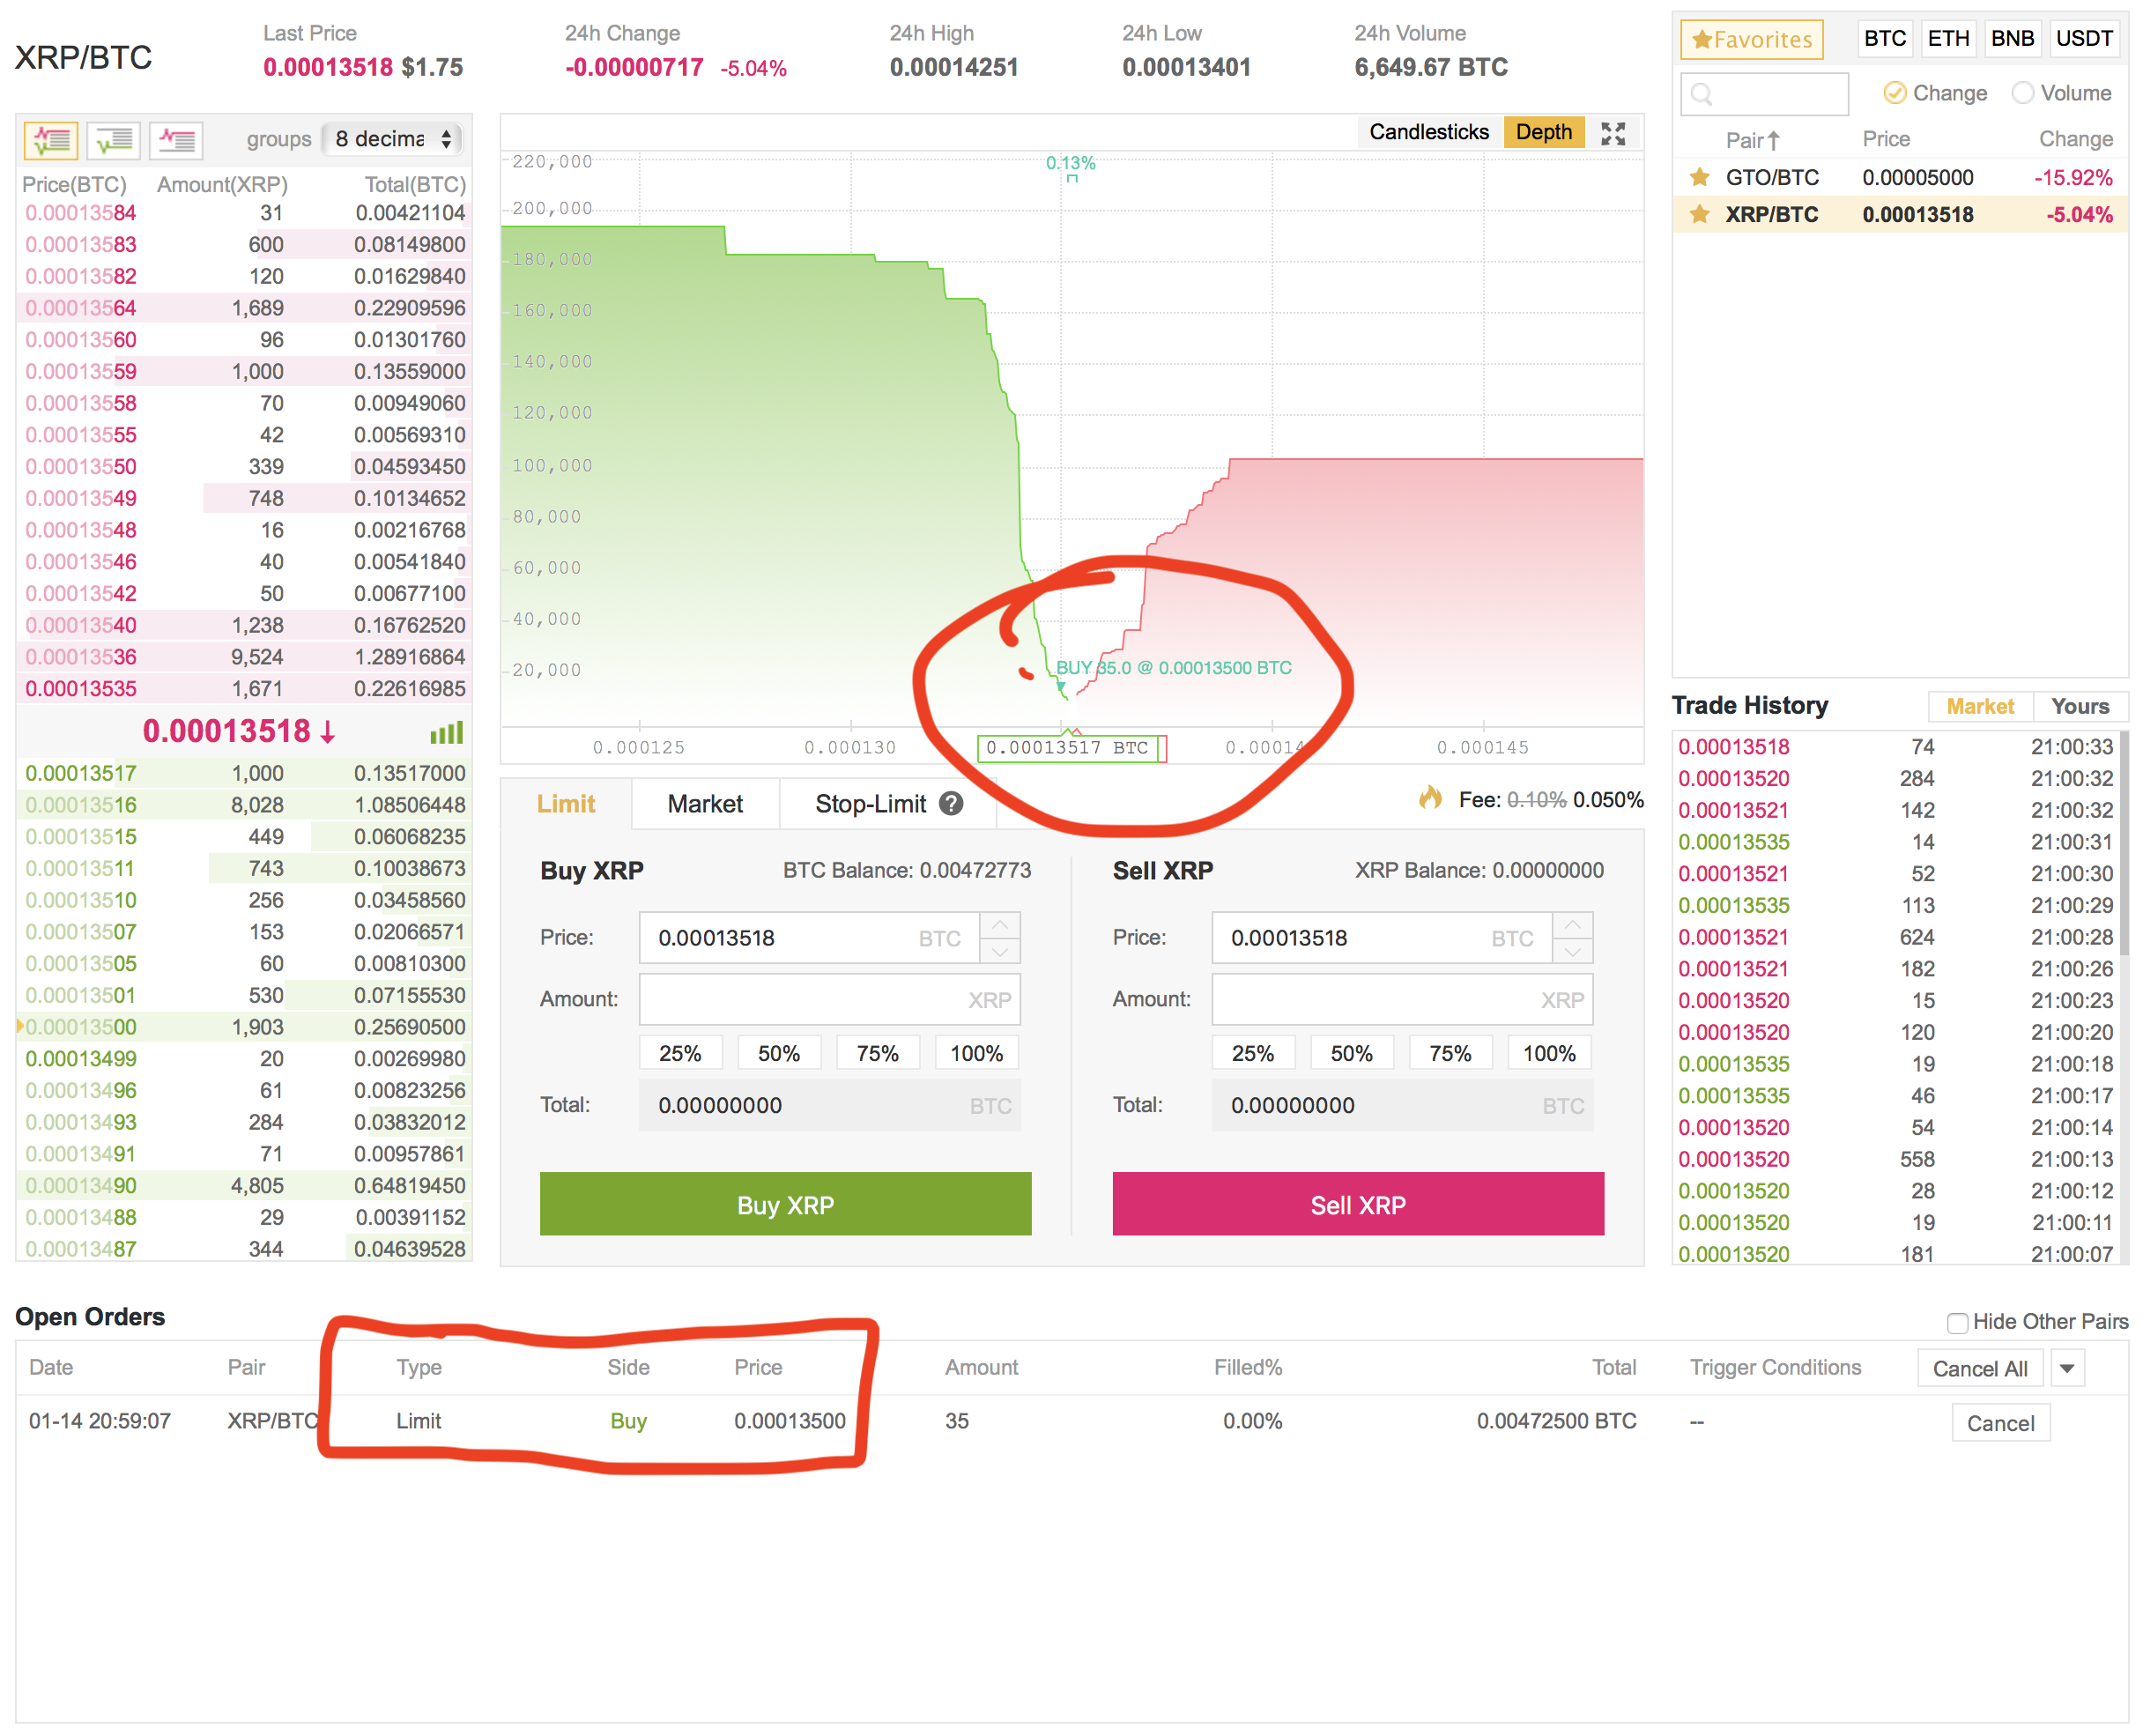
With the above story in mind, I seeked to keep 50% Bitcoin BTC and 50% Ripple XRP. Let’s go through the process of buying Ripple XRP. Please refer to the image below.
- Go to Exchange and click “Basic”.
- On the right-side, click “BTC” since I was holding bitcoins.
- Under search, type in “xrp”.
- Click the “star icon” to favorite the pair XRP/BTC.
- Click on “Limit” order (and always trade limit order as a habit).
- At this point, I encourage you to click the 50% found in amount under “Buy XRP” as well as click the 50% found in amount under “Sell XRP”. This is important when you are just beginning to understand the concept of currency pair. You see that I can buy 34 XRP. But I cannot sell because it has zero XRP.
Once you complete the above, go ahead and click “Buy XRP”.
Now let’s check on the Depth. Go and click “Depth” at the top right corner above the chart. My order to buy limit $0.00013500 is shown under Open Orders. Thousands of traders are “struggling” now… whether to sell to me 35 XRP. This is a battle of demand and supply; otherwise known as fear and greed!
Finally, the wait was over! I got filled with 34 XRP paying an average price of $0.00013688.
PS. I cancelled the previous order of $0.00013500. Then I placed a new order of $0.00013688.

What started off as S$200, the value had changed to US$125.41 after the transfer and converting 50% bitcoins to ripple.

I did a check at XE.com to see the equivalent of S$200 which was around US$151. The difference of US$151 — US$125.41 was approximately US$25.

To me, this US$25 goes to support the miners who are integral to the blockchain technology. I’m a believer now!
Congratulations!!! You’ve completed the baptism of cryptocurrency! You deserve a big pat as we need more evangelists like yourself.
STEP #9 → Tipping the Author 🤩
If this 8-step Checklist has helped you in any ways, please execute the last step! That is, you can tip the author 🙏 with your cryptocurrencies. All my addresses are found below.
Bitcoin BTC Deposit Address
→ 13Ws6A4nL4TUFicWetPWjEfGB4ppK7xmJX
Ethereum ETH Deposit Address
→ 0x56fa8831d3c21361e24ac7dd8bc399f38fd7335b
Bitcoin Cash BCC Deposit Address
→ 13Ws6A4nL4TUFicWetPWjEfGB4ppK7xmJX
Litecoin LTC Deposit Address
→ LSuT1e6hQdHcKLbBAoY4XhnsrWBi5bByQy

Thank you for reading this article. Please give it as many claps as possible 👏👏👏👏👏👏👏👏👏👏👏👏👏👏👏

